The AIY Maker Kit is a quickstart manual for embedded artificial
intelligence (AI) projects.
Using a Raspberry Pi and a few accessories, our tutorials show you how to
build a portable device that can identify objects, people, and
body poses with a camera, and recognize voice commands or other sounds
with a microphone.
You'll use machine learning (ML) to create new TensorFlow Lite models that
recognize your own objects and respond to your own speech commands. And
you'll learn to write code that reacts to these inputs to create a variety
of smart applications.
You don't need to know anything about machine learning and you don't need
to be a skilled programmer, but you should know your way around a
computer. We'll provide step-by-step instructions to run some code
examples and make a few code changes, and then you can decide how much
more code you want to write to build your own projects.
(We provide some help and ideas toward that as well.)
So let's get started!
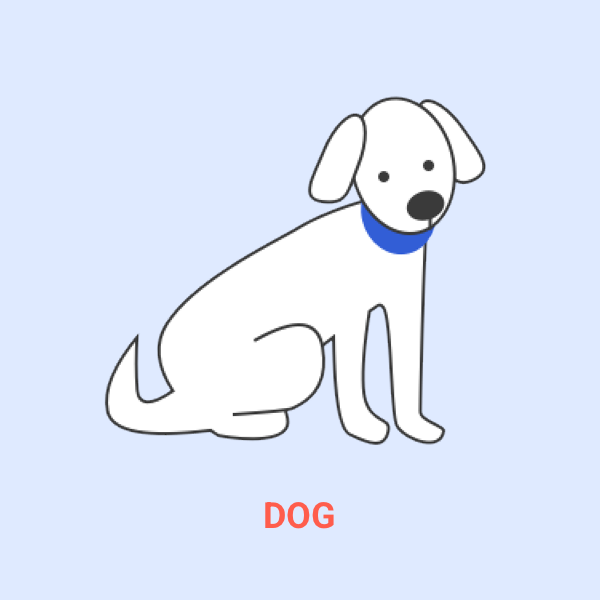
Locate objects
Identify body parts
Recognize speech
List of materials
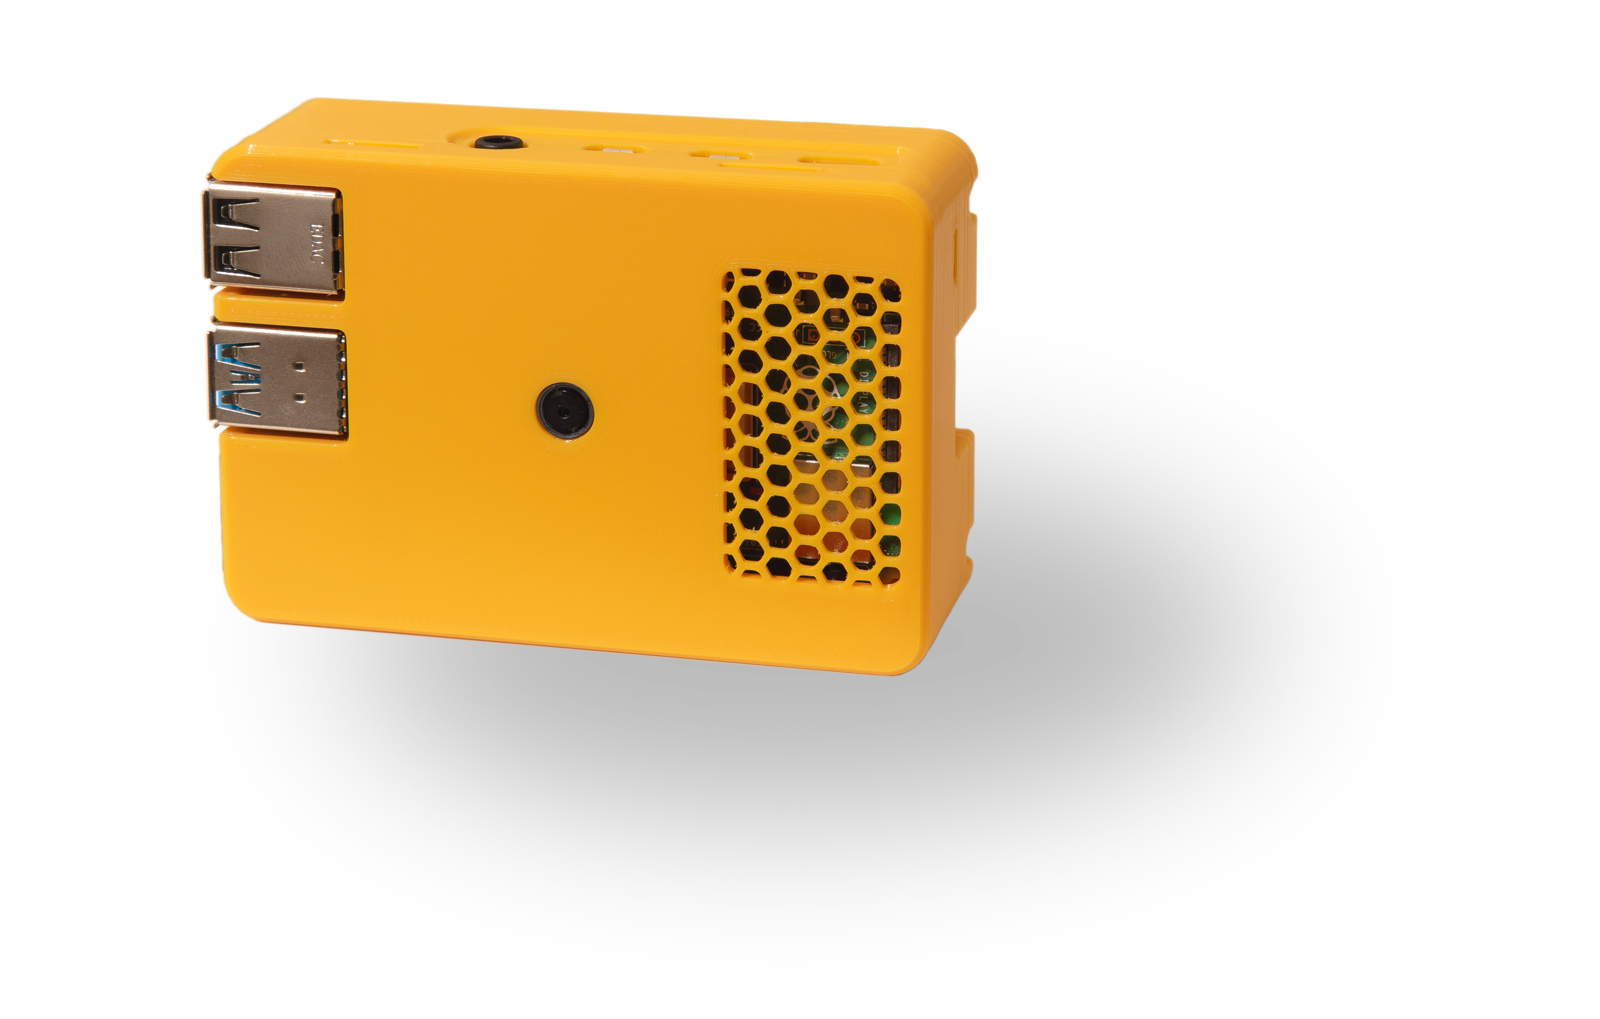
The Maker Kit hardware is based on a Raspberry Pi
computer, and to execute advanced ML models at high speeds, we use
the Coral USB Accelerator. This USB accessory includes a Coral
Edge TPU, which is a computer chip that's specially designed to run
machine learning (ML) models really fast—it's like an ML turbocharger
for your Raspberry Pi. Then you just need the eyes and ears—a
Pi Camera and USB microphone—to build your smart projects.
1
Raspberry Pi Camera
2
Raspberry Pi 4 (or Pi 3)
3
Coral USB Accelerator
4
USB-C cable (included w/ Coral)
5
microSD card (8 GB or larger)
6
5V/3A power adapter (USB-C for Pi 4, or Micro-USB for Pi 3)
7
USB microphone
Required hardware
1Raspberry Pi Camera(×1)
2Raspberry Pi 4 (or Pi 3)(×1)
3Coral USB Accelerator(×1)
4USB-C cable (included w/ Coral)(×1)
5microSD card (8 GB or larger)(×1)
65V/3A power adapter (USB-C for Pi 4, or Micro-USB for Pi 3)(×1)
7USB microphone(×1)
Get the hardware
All the parts listed above are available from a variety of electronics
distributors. If you need all the parts or just some of them, you can find
them at the online shops below.
You also need a personal computer that's connected to
Wi-Fi. You can use a
Windows, Mac, or Linux computer. Our instructions include steps for Windows and
Mac only, but if you're a Linux user, you should be able to follow along just
fine.
Hardware exceptions:
You can use a USB camera instead of the Pi Camera (it just won't look
as neat in the cases below). You can also use a Raspberry Pi Zero 2, instead
of a Pi 3 or Pi 4, but you'll need an extra USB adapter for the accelerator
and microphone.
The AIY Maker Kit isn't just about making AI, it's also about being a maker!A maker is a person who builds stuff.
Often, a maker will creatively combine technology
with hardware to solve problems, provide entertainment, create art, or
just to explore technology. So it's up to you
to create a case for your kit.
We offer two DIY options, but neither are required and you can create a
case that's completely different. If you build your own case, just make sure
the Raspberry Pi and USB Accelerator have room to breathe because they can get
hot.
1
Case top
2
Case base
3
Glue stick
4
Craft knife
5
Scissors
6
Cardstock or cereal box cardboard (10" x 6")
7
Box from the Coral USB Accelerator
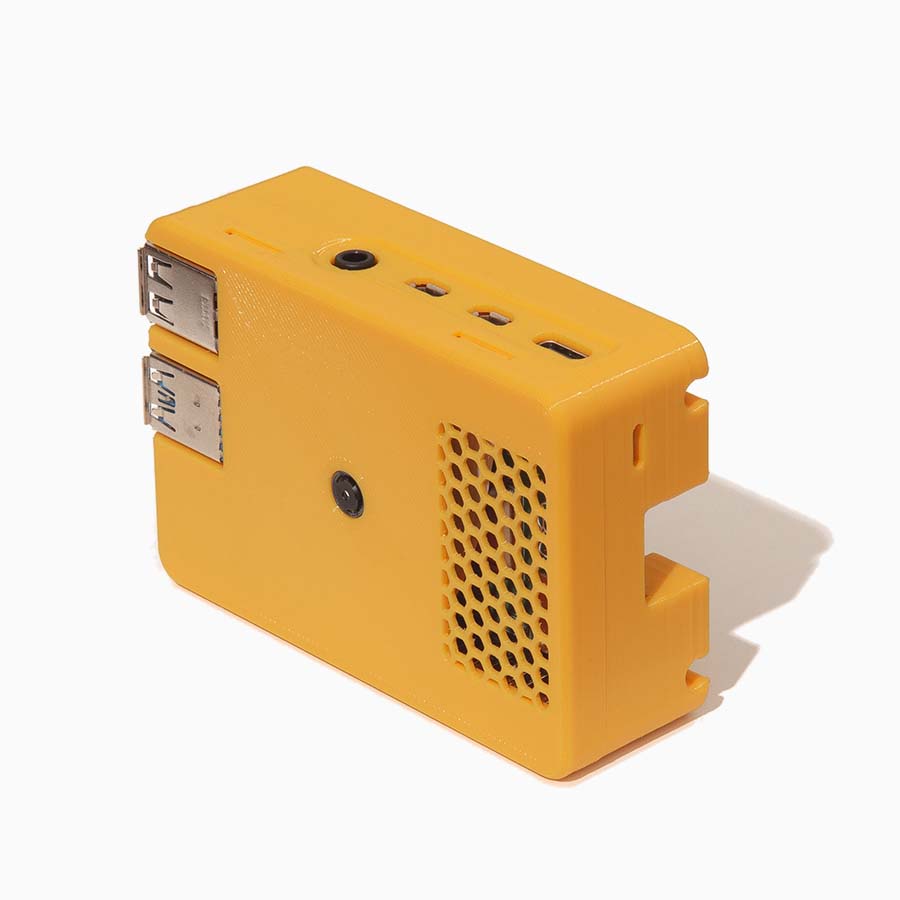
3D-printed case
1Case top(×1)
2Case base(×1)
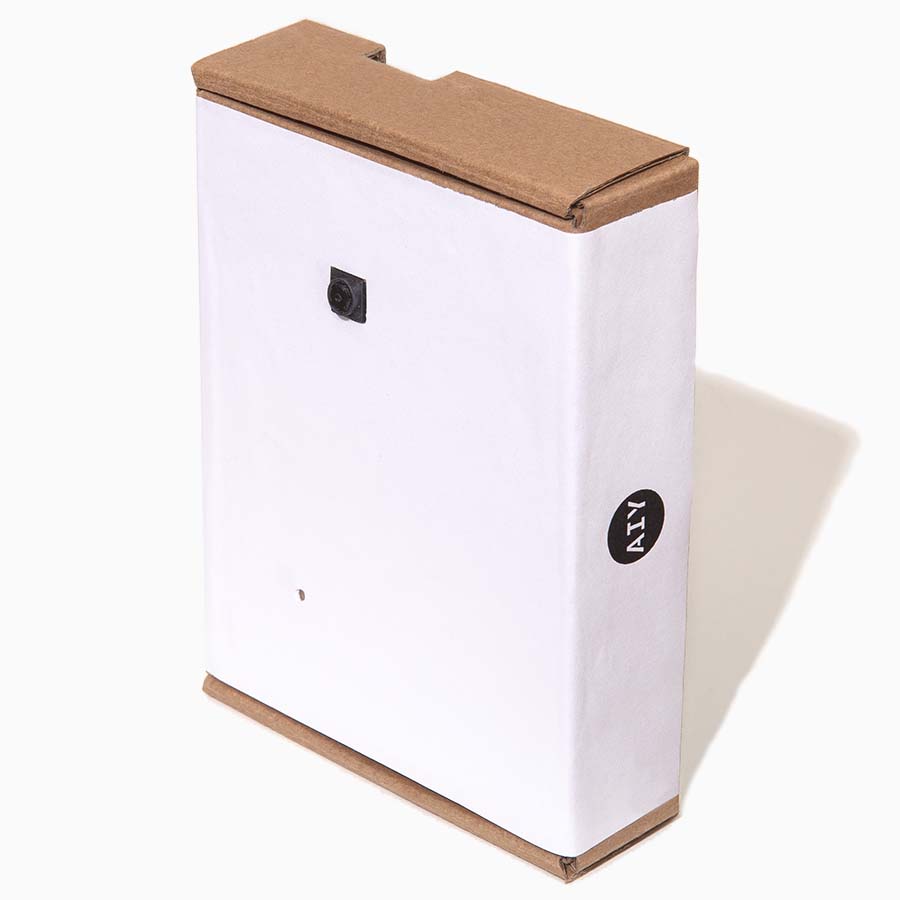
Cardboard case
3Glue stick(×1)
4Craft knife(×1)
5Scissors(×1)
6Cardstock or cereal box cardboard (10" x 6")(×1)
7Box from the Coral USB Accelerator(×1)
Create a case
Here are the design files for our DIY cases.
3D-printed case
This 3D-printed case snaps together with two parts. The top includes a
mount for the Pi Camera, and you can re-orient the camera by printing a
separate camera enclosure (not pictured). The design includes variants for
Raspberry Pi 4 and Raspberry Pi 3.
If you don't own a 3D printer, you can still get this case:
Search the internet for "local Makerspace" where they might have a 3D printer you can use.
Find an online "3D printing services" that will print the parts and mail them to you.
The following ZIP file includes
all the STL files for printing, plus STEP files so you can remix the design. For
more information, see the included README files.
Note:
Begin printing the case or place your order for one and then continue
with the setup guide. You can put the hardware
into your case later on.
This cardboard case holds everything together and can be assembled in less
than an hour. The case is built using a small sheet of cardstock (or other thin
cardboard such as from a cereal box) and the box in which your Coral USB
Accelerator was packaged.
The following PDF files include all the assembly instructions and
the templates you need to print for construction. Be sure you download the
appropriate PDF format for your printer paper.
Note:
Don't begin assembling the cardboard case until
you begin flashing the SD card.
Beware:
Unfortunately, if your Coral USB Accelerator included a black USB
cable (instead of a white USB cable), it will not fit into this
cardboard box design.
The following instructions show how to flash your microSD card with our AIY
Maker Kit system image and assemble your case. The Maker Kit system image includes
Raspberry Pi OS with all software and settings that enable the ML projects that follow.
Before you start, double check that you have all the required materials.
It's okay if you don't have your case yet; you can start programming now
and put that together later.
Note: If you already have a Raspberry Pi system, we
suggest you follow these instructions to re-flash your microSD card (or flash a
different SD card), because it will avoid many possible conflicts with the
software dependencies. However, if you insist on using an existing system, we
do offer a guide to upgrade an existing
Raspberry Pi system (for experienced Raspberry Pi users only).
1. Flash the SD card
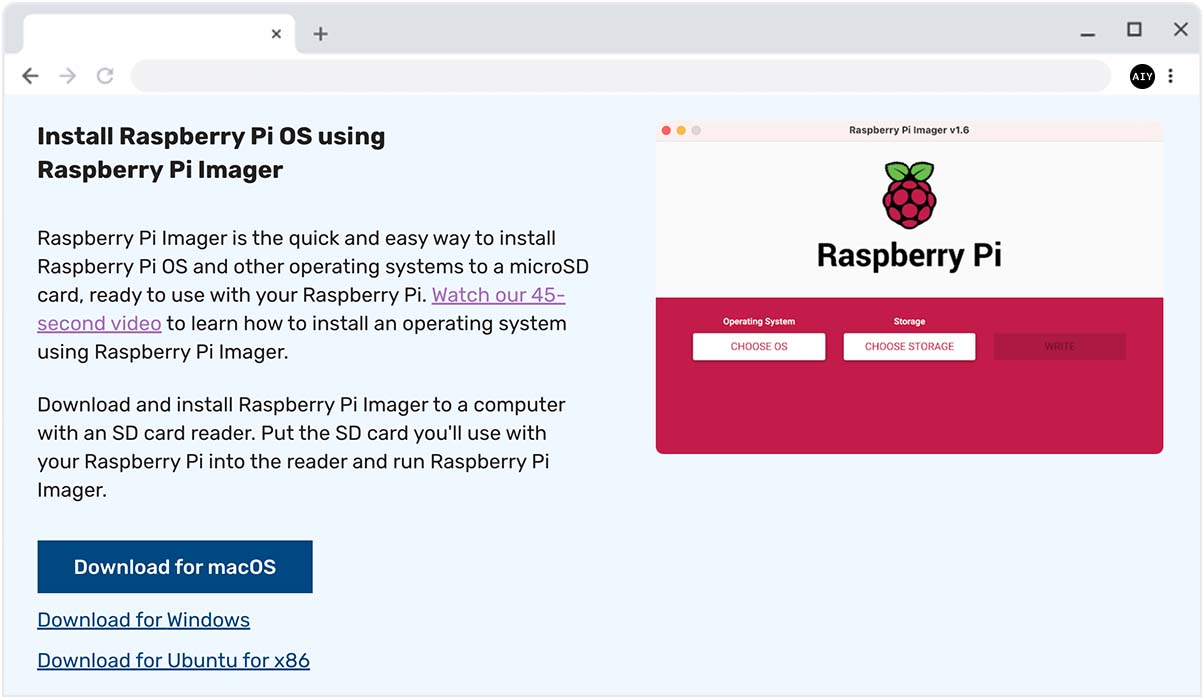
Get the SD card image
Download the Maker Kit system image (based on Raspberry Pi OS):
The web page detects your operating system, so just
click the blue Download button.
Install the Raspberry Pi Imager app.
On Windows, launch the .exe file and follow the setup wizard.
On Mac, launch the .dmg file and drag the Raspberry Pi Imager into
the Applications folder.
Note: You must have Raspberry Pi Imager v1.7 or higher.
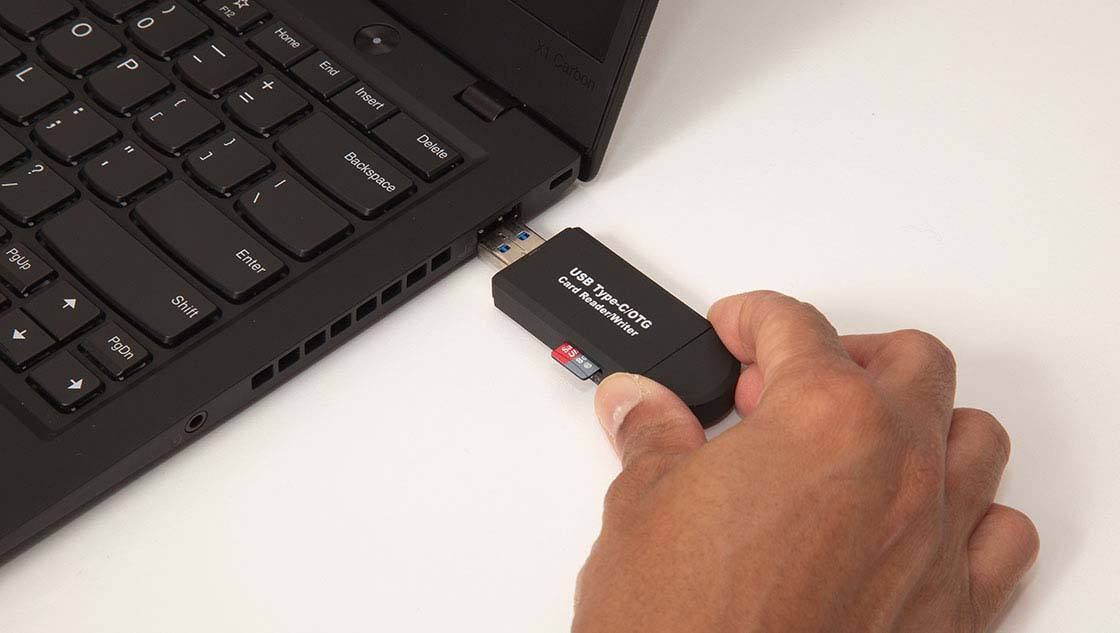
Connect the SD card to your computer
Use an SD card adapter (if necessary) to connect your microSD card to
your Windows, Mac, or Linux computer.
Select the SD card and system image
Launch Raspberry Pi Imager.
Click Choose OS, scroll to the bottom, and select Use custom.
Select the Maker Kit system image (the .img.xz file you downloaded above).
Click Choose storage and select your microSD card (it might be named something like "Generic MassStorageClass Media").
Do not click Write yet.
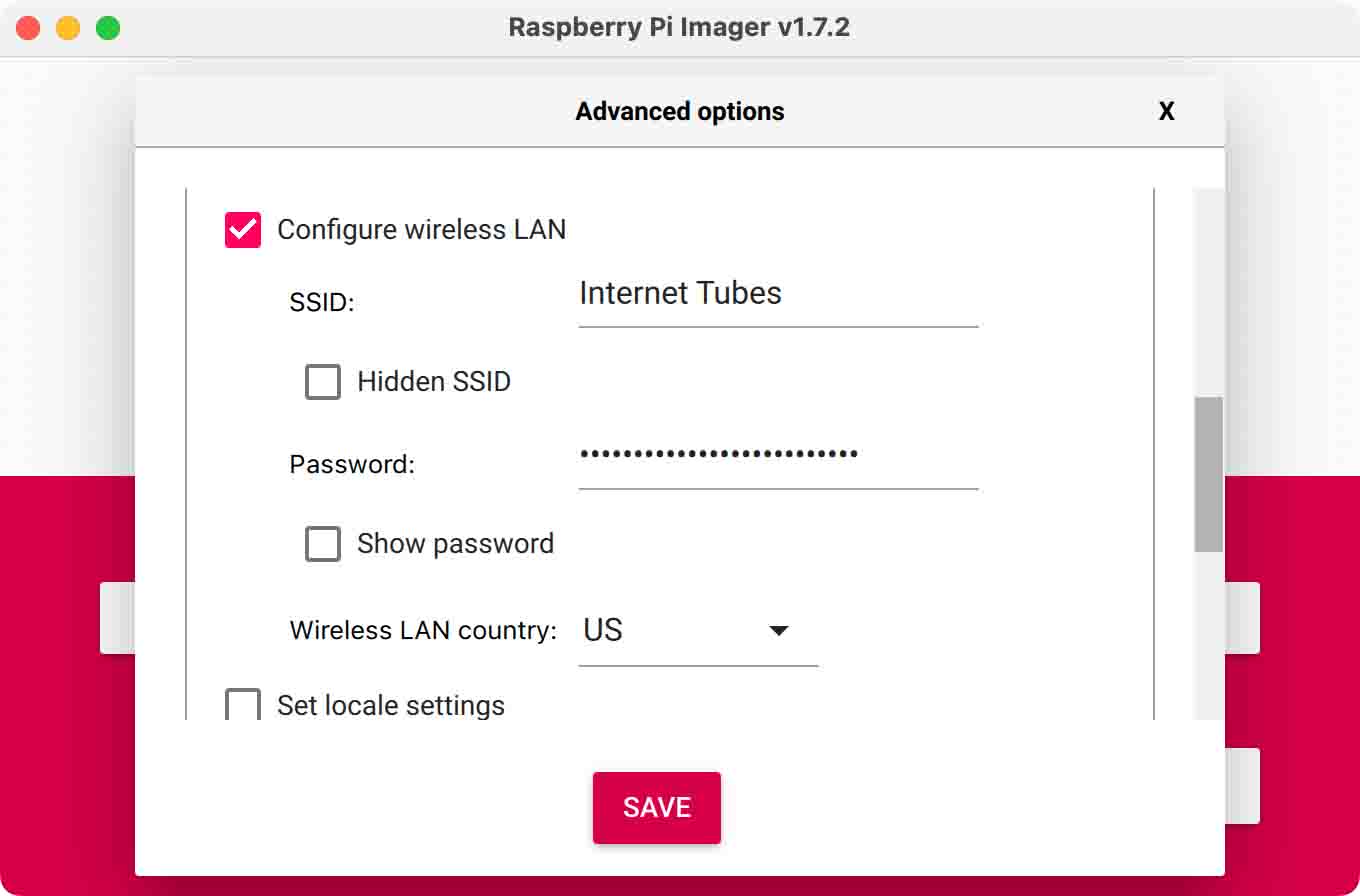
Configure advanced settings
In order to log into the Raspberry Pi wirelessly, you must specify
the Wi-Fi details for the system image:
Click the gear icon in Raspberry Pi Imager to open the Advanced options.
Scroll down a little, select Configure wireless LAN,
and then enter your Wi-Fi name (SSID) and password.
Beware that the SSID name is case sensitive (capitalization matters).
Be sure that Wireless LAN country is set to your current location.
Triple-check that your Wi-Fi name and password are correct, and then click Save.
Now click Write to begin flashing the SD card.
This can take several minutes. So while that’s working, proceed to assemble your case.
The following instructions are for the 3D-printed case.
If you don't have your case yet, that's okay, just connect the
hardware as described below (connect the camera and USB Accelerator)
and you can put it in the case later.
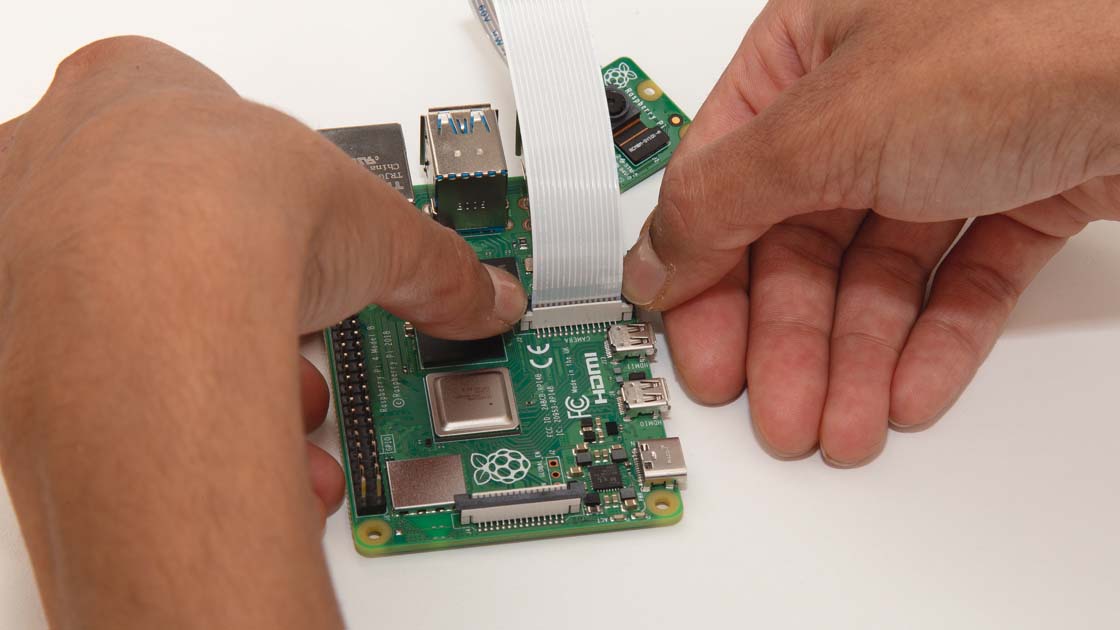
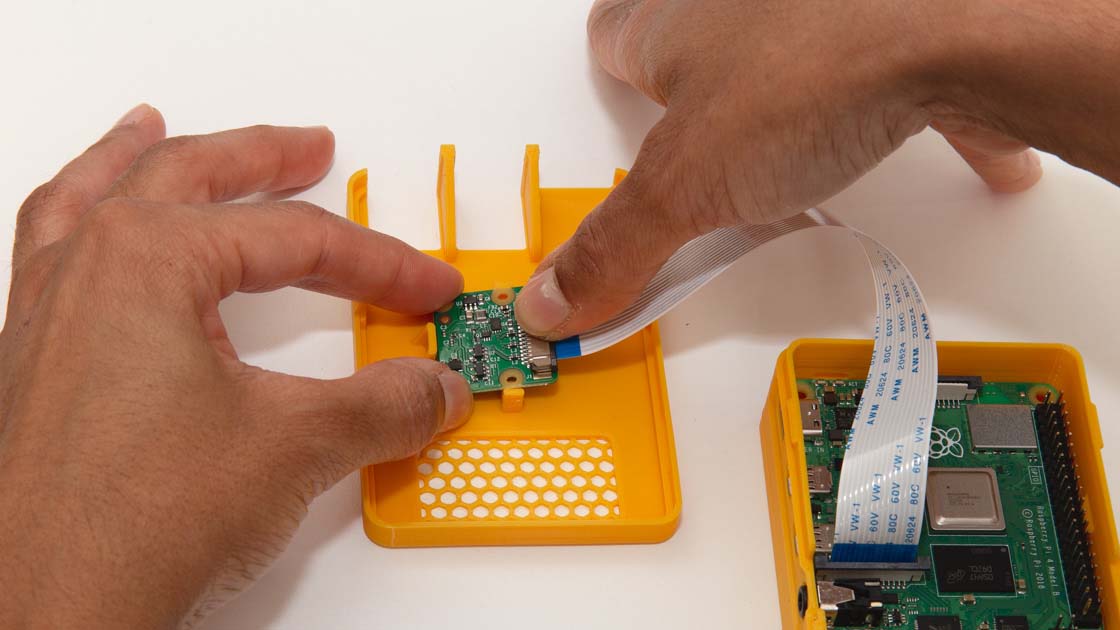
Between the HDMI ports and the headphone jack, you'll find the camera cable latch.
Pull up on the black latch to open it.
Insert the flex cable and close the latch
Grab the end of the camera flex cable (it should already be attached to the Pi Camera)
and insert it so the blue strip is facing toward the black latch.
Be sure the cable is inserted fully, and then push down on the latch to lock the cable
in place.
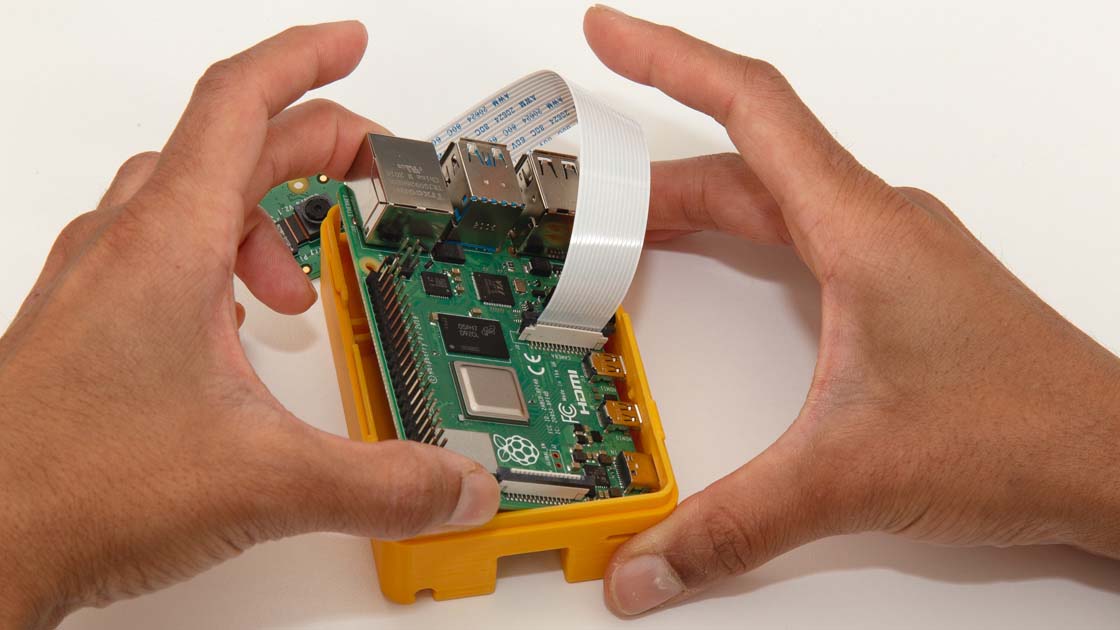
Insert the Raspberry Pi
Start by inserting the side of the board with the headphone jack so those plugs rest in the
corresponding holes.
Then press down on the opposite side of the board (with the 40-pin header) so it snaps into
place. You can gently pull outward on the case wall so it snaps in easier.
Make sure it's inserted fully: The Ethernet port should rest flat on the case opening,
and the SD card slot on the opposite side should be accessible.
Note: The SD card should not be in the board yet—it can make inserting the board more difficult.
Attach the Camera
First set the camera's top mounting holes onto the matching pegs, and hold them firmly in place.
Be sure the holes on the camera board are aligned with the posts, and then press firmly on
the cable connector to snap the camera into place. You might need to press hard.
Ensure that both side clips are now holding the board and the camera lens is set in the hole.
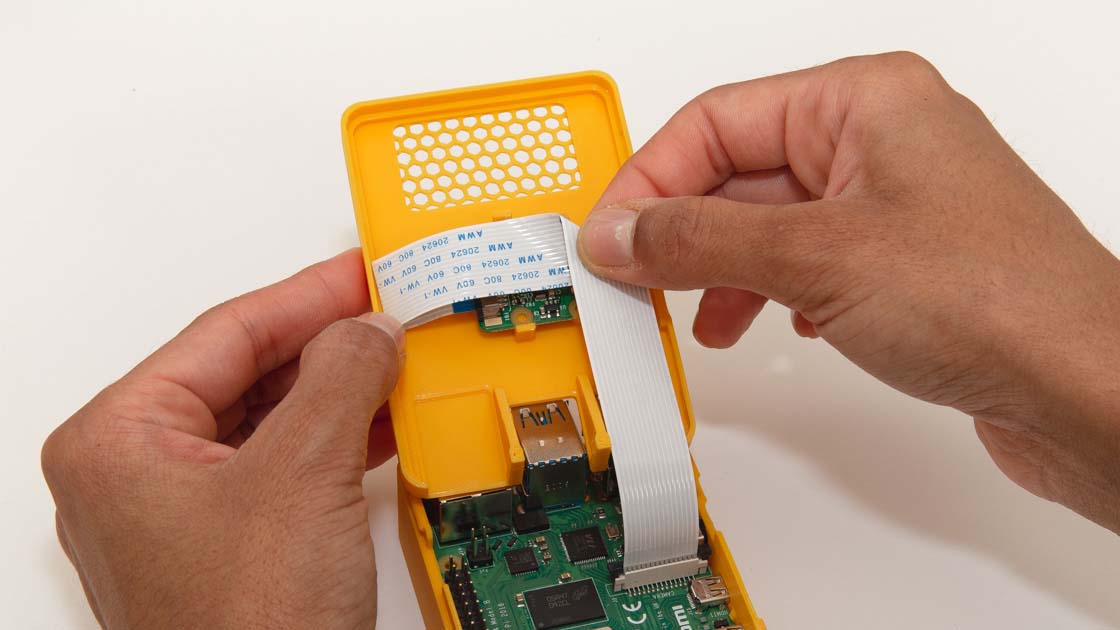
Fold the flex cable
Press the cable against the roof of the case and then fold it backward where it meets the wall, creasing the cable.
Then fold the cable again at a 90-degree angle after it passes over the camera, creasing it so the
cable turns toward the outer USB cutout, as shown in the photo.
Don't worry, you will not damage the cable by creasing it.
Set the cable inside
As you close the lid, the flex cable should turn backward one more time, right behind the USB ports.
You do not need to crease the cable here.
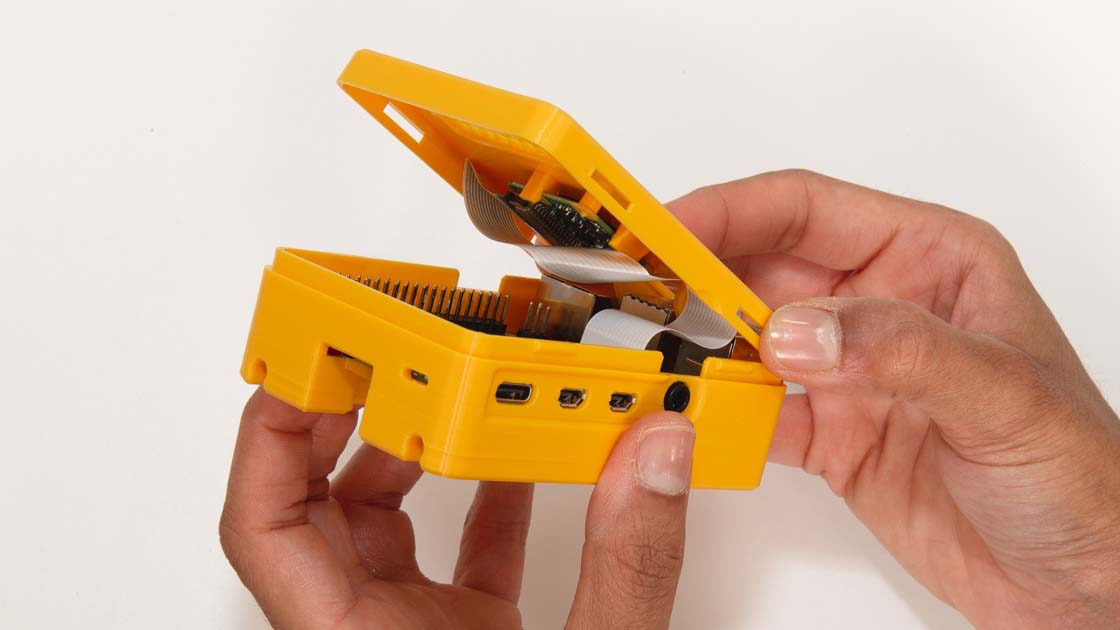
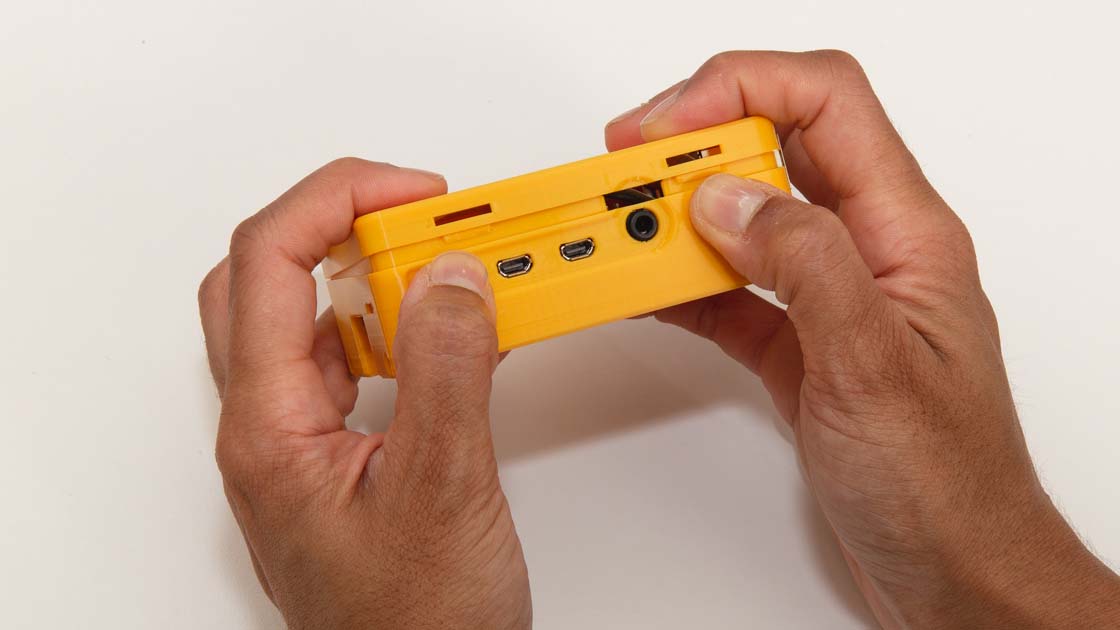
Snap the lid shut
First set the clips on the side near the board's GPIO header.
Then set the opposite side by pressing gently on the side with the plug openings, while pressing down on the lid.
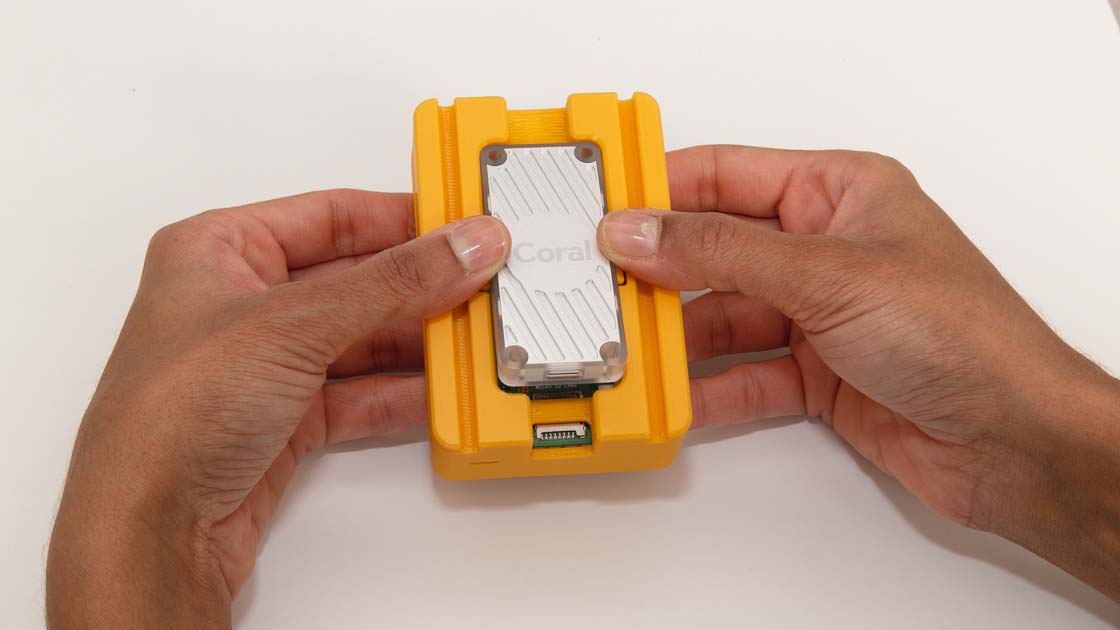
Attach the USB Accelerator
Start by setting the top corners of the USB Accelerator into the case, so the USB plug is on the same inside
as the microSD port on the Raspberry Pi.
Then press down to snap it in.
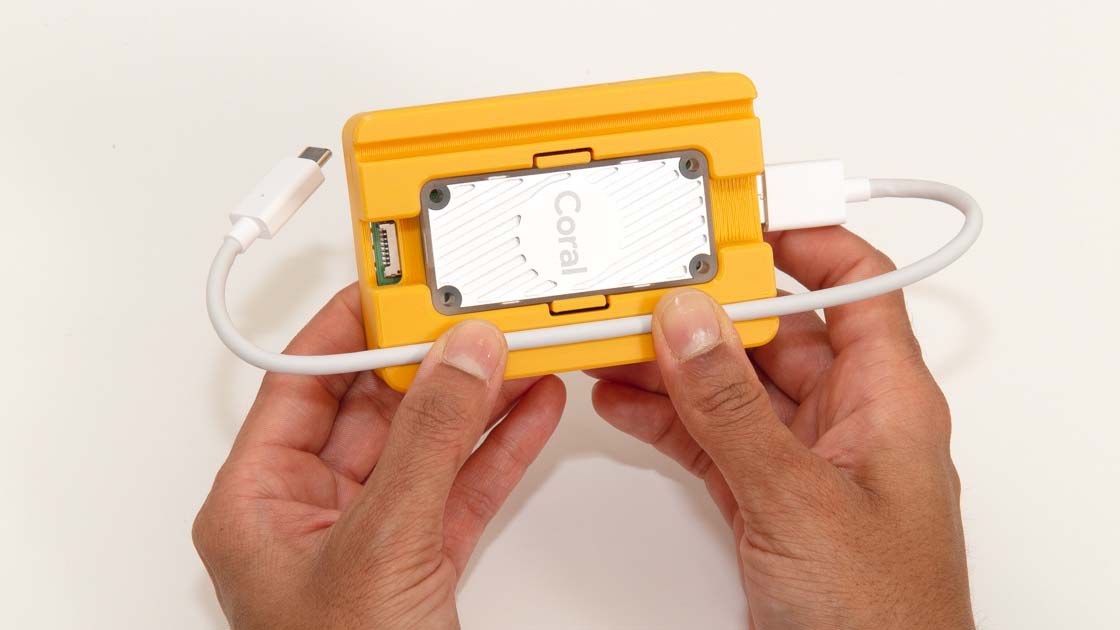
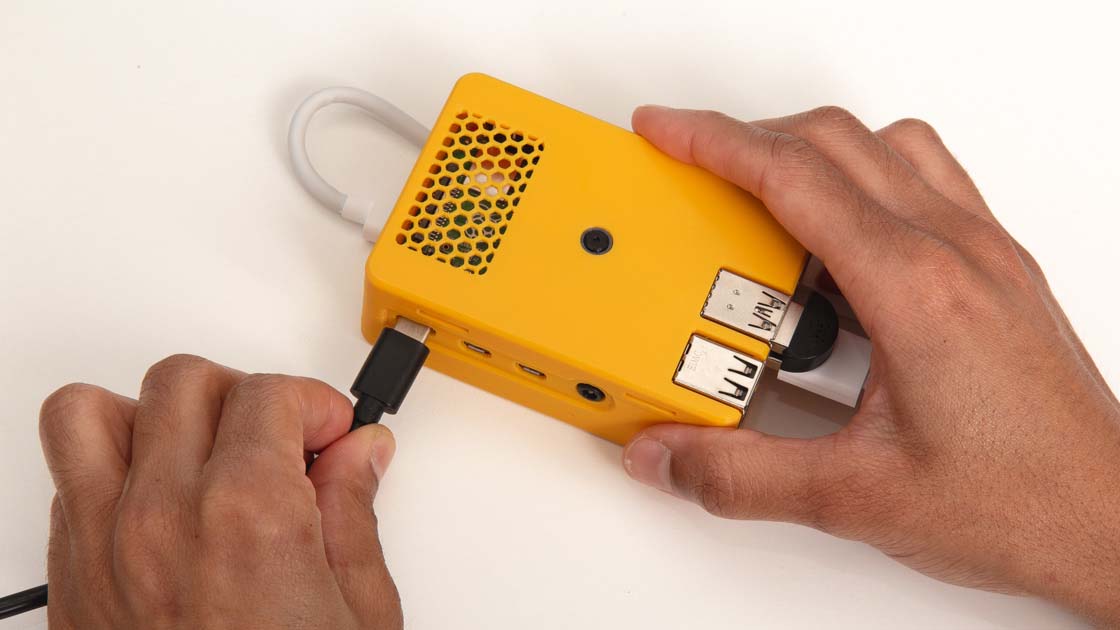
Connect the USB cable
Connect the USB cable to one of the blue ports on the Raspberry Pi,
and press the cable into either of the two cable guides.
The blue ports support USB 3.0, which provides much faster
data-transfer speeds than USB 2.0.
Leave the USB Accelerator unplugged so you can access the microSD slot.
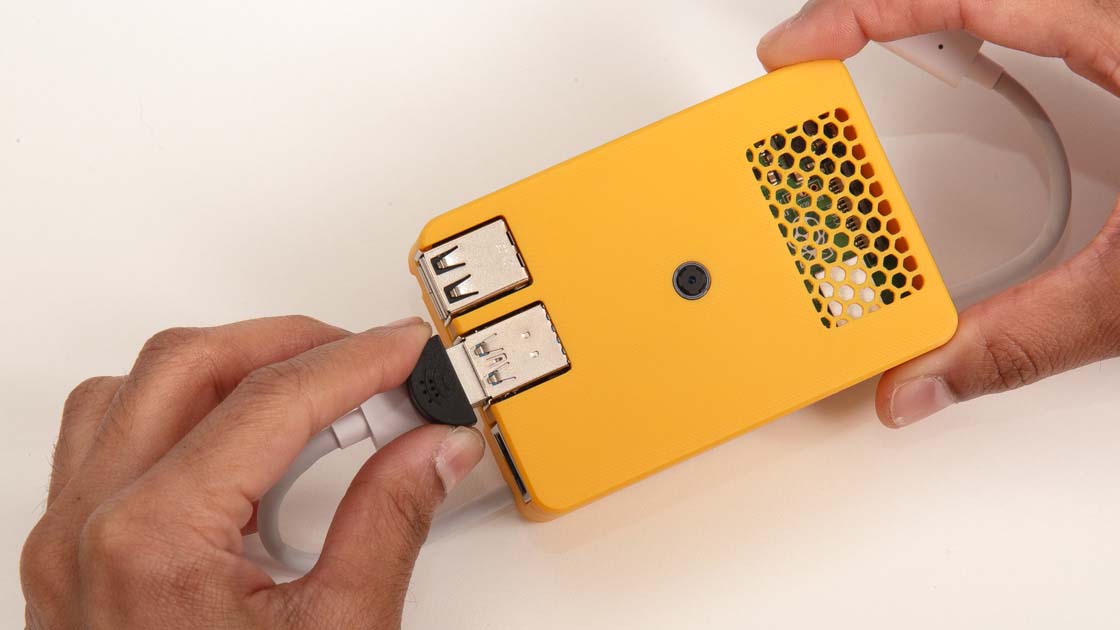
Attach the USB microphone
If you plan on using audio classification (speech recognition), then attach your USB
microphone to any of the available USB ports.
Note: The headphone jack on the Raspberry Pi does not support input, so you must
use a USB microphone (unless you're also using audio HAT with a mic input).
3. Turn it on
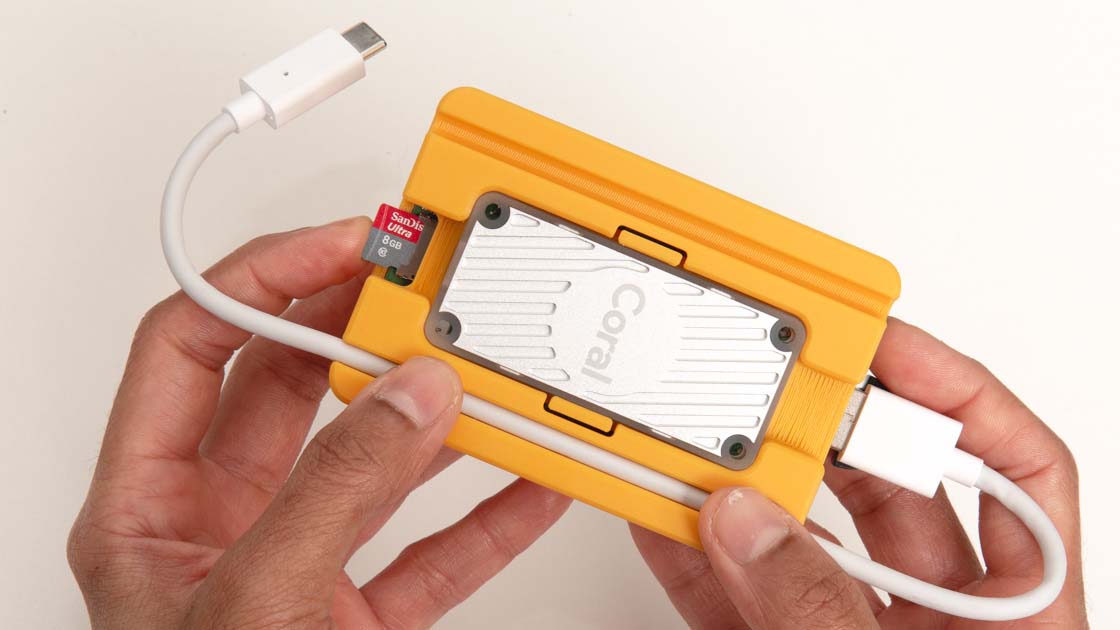
Insert the SD card
Wait until your SD card is done flashing. Raspberry Pi Imager will show a dialog that says Write Successful and it automatically "ejects" the card.
Remove the SD card from your computer.
Locate the SD card slot on the bottom of the Raspberry Pi and insert the microSD card (the card label faces away from the board).
If you're using the 3D-printed case, you can now plug the USB cable into the USB Accelerator.
Power on the Raspberry Pi
Plug in your USB power adapter to the board, and connect it to your wall power supply.
Note: You do not need a monitor, keyboard, or mouse attached to the Raspberry Pi.
You will connect to the board over Wi-Fi.
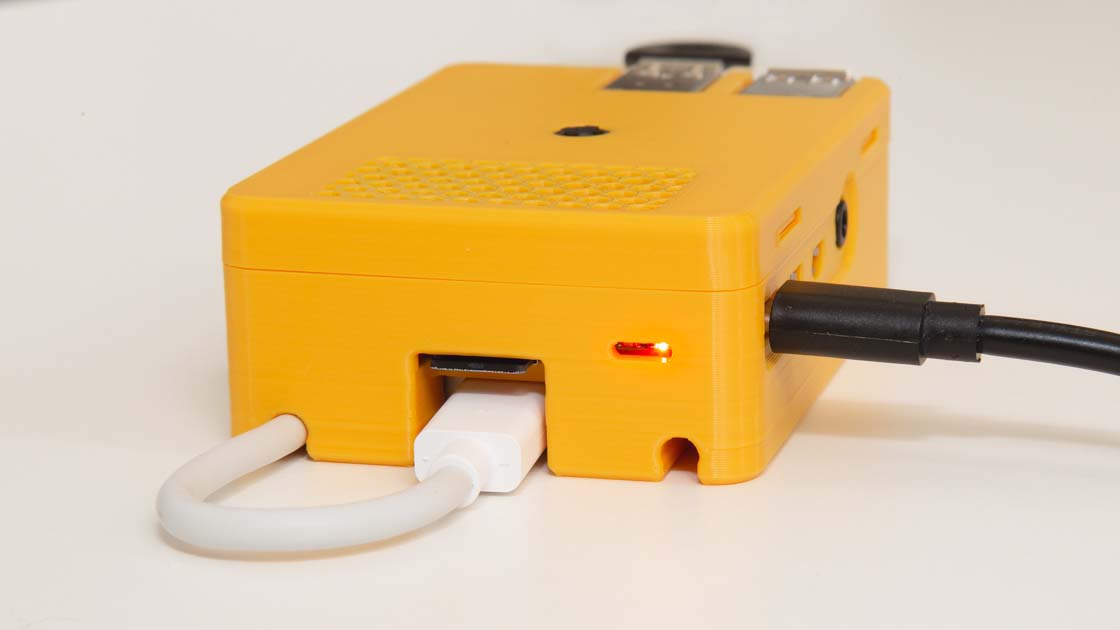
Let it boot up
Make sure the red LED next to the SD card slot is illuminated.
The green LED also flickers during boot-up.
Allow about two minutes for the system to boot up for the first time.
When it's ready, the green LED mostly stops blinking, while the red LED
remains solid. (Subsequent boots are much faster.)
Warning! The Coral
USB Accelerator can become very hot after extended use. Always avoid
touching the metal surface during operation.
Caution: The Raspberry Pi OS is running directly from the microSD card, so you should never remove the card while the board is powered on. Doing so can corrupt the card data.
The web page detects your operating system, so just click the blue
Download VNC Viewer button.
Install the VNC Viewer app.
On Windows, launch the .exe file and follow the setup wizard
(we recommend you leave any install settings as their defaults).
On Mac, launch the .dmg file and drag the VNC Viewer into the
Applications folder.
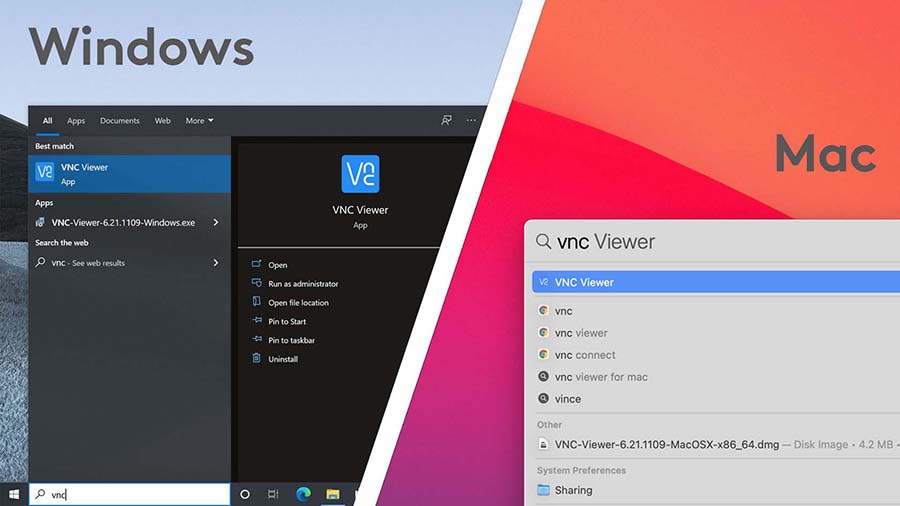
Launch VNC Viewer
On Windows:
Press the Windows-logo key to open Windows search and type "vnc".
Click VNC Viewer to launch the app.
On Mac:
Press Command + Spacebar to open Spotlight search and type "vnc".
Click VNC Viewer to launch the app.
At the startup screen, click Got it to continue.
Find the Raspberry Pi's IP address
Your Raspberry Pi should already be booted up and connected to your Wi-Fi network (because
we specified the Wi-Fi login during the flash procedure).
So we now need to get its IP address.
On Windows:
Open a Command PromptThis is a Windows app that allows you to issue command-line instructions. To open it, press the Windows-logo key to open search, type "command prompt" and then press Enter to open the app. and run this command:
ping raspberrypi -4 -n 1
The first line in the response should include the IP address in brackets.
Keep this IP address visible for the next step.
On Mac:
Open a TerminalThis is an app that allows you to issue command-line instructions. To open it, press Command + Spacebar to open search, type "terminal" and then click Terminal.app. and run this command:
ping raspberrypi -c 1
The first line in the response should include the IP address in parentheses.
Keep this IP address visible for the next step.
Help! If this does not print the IP address, try the following:
Wait a couple minutes in case the Pi is not fully booted up. If the ping command still fails, unplug the Raspberry Pi and plug it in again, and then wait a minute to try again.
Connect an HDMI monitor to your Raspberry Pi. On the Raspberry Pi desktop, you should see a file with your IP address as its name—write it down. If the filename is "Network not found," the Raspberry Pi could not connect to your Wi-Fi, so reflash the SD card and verify the Wi-Fi name and password in the advanced options.
If you're still unable to connect over Wi-Fi, connect an Ethernet cable between your Raspberry Pi and PC and run the ping command again. You'll need to keep the cable connected while using VNC.
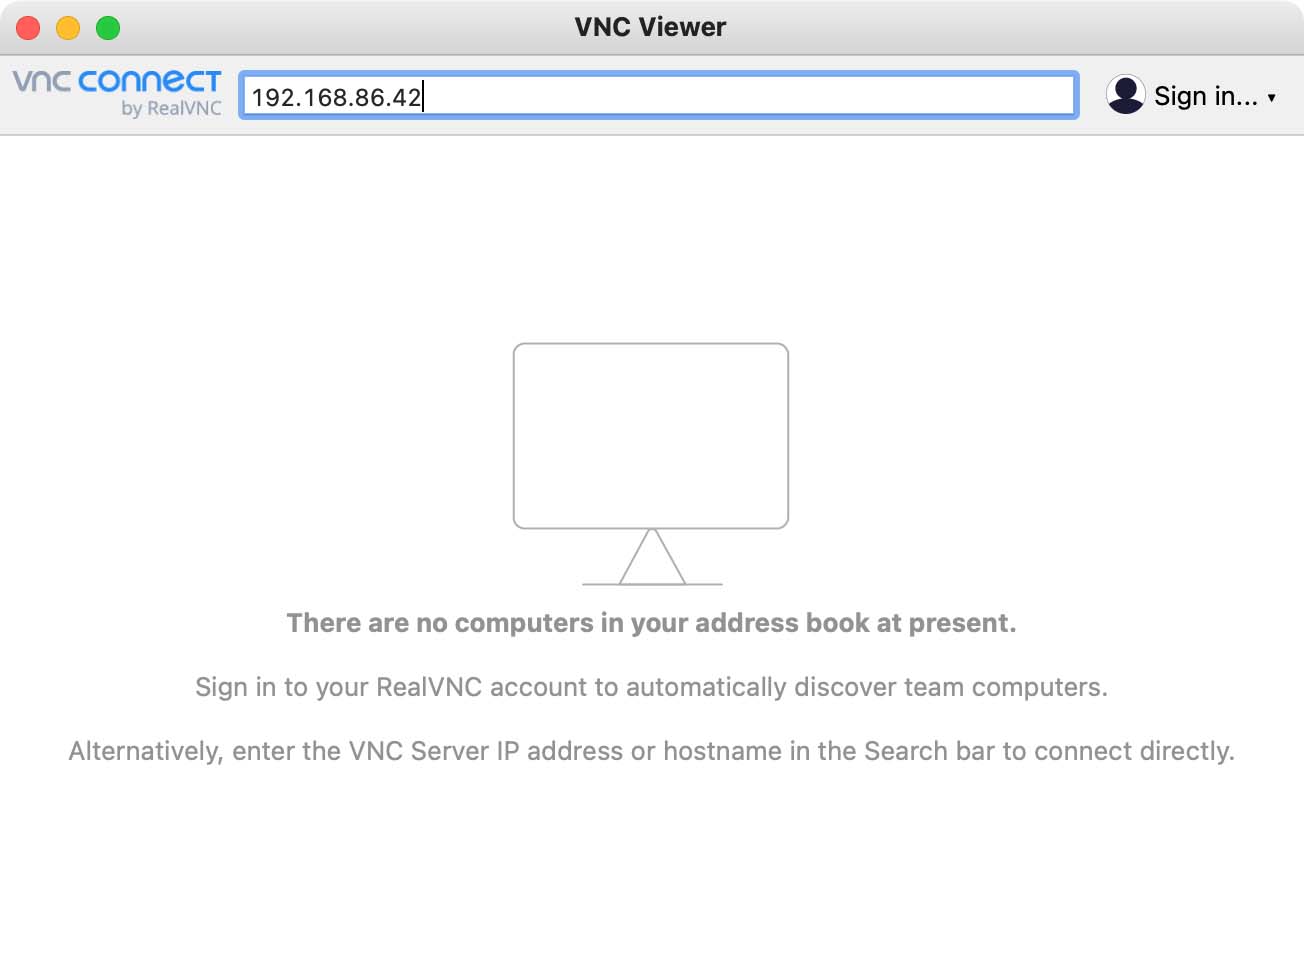
Enter the IP address
Type the IP address in the text box at the top of the VNC Viewer window.
VNC Viewer will save this device address. So next time you want to connect, you can
just double-click on the device that appears in VNC Viewer.
Note: After you shut down your Raspberry Pi for a while, it's possible
the Raspberry Pi's IP address will change when you turn it back on.
So if VNC is unable to connect to your saved device, repeat
the previous step to find the IP address. Then right-click on the device in
VNC Viewer, select Properties, and update the IP address on that screen.
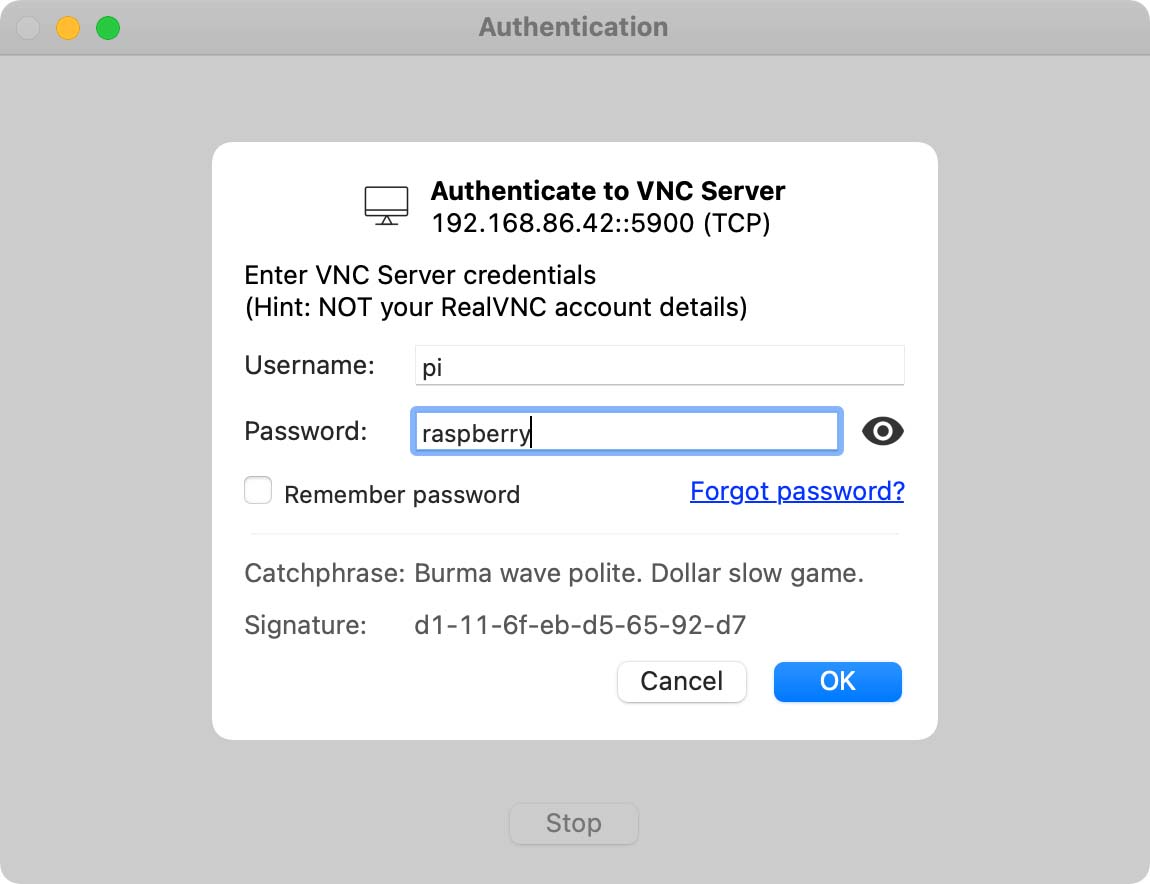
Log in using the default password
You should then see a login dialog where you can use the following
login information:
Username: pi Password: raspberry
Click OK, and in moment you'll see the Raspberry Pi desktop appear.
Note: You might need to resize the VNC Viewer so you
can see the whole Raspberry Pi desktop. (Because we did not connect a monitor
to the Raspberry Pi, it uses a fixed window size. You can customize the resolution
later by running sudo raspi-config.)
Complete the Pi OS setup
The desktop might show two dialogs on top of each other.
If the dialog on top is a warning to change your password,
click OK to dismiss it (you'll change the password next).
The other dialog says "Welcome to Raspberry Pi" and helps you configure some settings:
Click Next and follow the wizard to set your country, language, and timezone.
You'll then see a page where you can change the password, so enter a new password
and click Next.
Ignore the page to set up your screen and click Next.
Also ignore the page about WiFi because you're already online, so
click Skip.
When it offers to update your software, click Skip because it's not
necessary and can take some time.
Now you're ready to start developing with ML!
Note:
If you want to change your password again later, open the Terminal and run the passwd command.
How to shut down
You just got started, so don't shut down yet, but when you decide you're done
for the day, it's important that you properly shut down the
system before unplugging the power.
You can shut down the system in two ways:
When viewing the Raspberry Pi OS desktop, open the applications menu
(the Raspberry Pi icon in the top-left corner of the desktop) and
click Shutdown.
From the Raspberry Pi terminal, run the following command:
sudo shutdown
Wait for the green LED to stop blinking (the red LED stays on even when the
operating system is shut down), and then unplug the power.
Caution:
Failure to properly shut down the system before unplugging the
power could corrupt the SD card data.
Project tutorials
Now the real fun begins! Let's build some Python projects with machine
learning models!
To make these projects easier, we created some helpful Python APIs in the
aiymakerkit module. These APIs perform the complicated
(and boring) tasks that are required to execute an ML model. Our APIs also
perform common tasks such as capturing images from a camera, drawing labels
and boxes on the images, and capturing audio from a microphone. This way,
you need to write a lot less code and can focus on the features that make your
projects unique.
So let's get started!
Note: Basic programming experience is required to
complete these tutorials. Each tutorial begins with a fully functional
Python script that you can run from the terminal. To expand on these scripts,
the tutorials provide some new code you can copy-paste into the files.
That means you need to know just the basics about Python code syntax, such as
line indentations, so you know how to insert the code.
Verify your setup
All the software you need is already installed on the system image you flashed
to your SD card. So let's run a quick test to make sure your hardware is
connected and working as expected.
Open the TerminalThe Terminal is an app that allows you to issue command-line instructions for the computer. On the Raspberry Pi desktop, the Terminal icon appears in the task bar at the top (it looks like a black rectangle). Click it to open a terminal window. on your Raspberry Pi. By default, the
terminal opens to your Home directory and the prompt looks like this:
pi@raspberrypi:~ $
pi is the username and raspberrypi is the device hostname. These are the default names, but
perhaps yours are different if you changed them in the Raspberry Pi Imager options.
The squiggly line (called a tilde) represents the Home directory, which is
currently where the command prompt is located. (You can run
pwd to see the full path name for your current directory.)
Change your directory to the aiy-maker-kit folder by typing this command and then pressing Enter:
cd aiy-maker-kit
Then run our test script with this command:
python3 run_tests.py
This runs some tests to be sure the required hardware is detected.
If all the tests succeeded, the terminal says "Everything looks good." If
something went wrong, you should see a message with a suggestion to
solve the problem, so take any necessary steps and try again.
Now you're ready to build some projects with ML!
But before you continue, change your directory again to the examples folder
where we'll get started:
cd examples
Build a face-detecting smart camera
Objective:
Create an app that takes a photo when all visible
faces are centered in the frame.
What you'll learn:
How to continuously capture frames from the camera.
How to feed each frame to an object detection model.
How to check if a detected object is inside a rectanglar region.
This project builds upon the detect_faces.py example, so let's start
by running that code:
Your terminal should already be in the examples directory, so just run this command:
python3 detect_faces.py
Make sure the camera is pointed toward you and your face is well lit
(point the camera away from any windows/lights).
When the video appears on the screen, you should see a box drawn
around your face. Also try it with multiple faces. If there's nobody else
around, you can hold up a photo instead.
Note: If you see a warning that says,
"Locale not supported by C library," you can ignore it. It's harmless
and related to your locale change during setup, so it will go away
after a reboot.
Press Q to quit the demo. (If it does not close, click on the camera window
so it has focus and then press Q again.)
To start building the smart camera, make a copy of detect_faces.py with a new
name that will be your project file. Here's a quick way to make a copy from the terminal:
cp detect_faces.py smart_camera.py
Now open the new file for editing in
ThonnyThonny is an integrated development environment (IDE) for Python programming—basically a fancy text editor that specializes in Python code. (learn more about Thonny):
thonny smart_camera.py &>/dev/null &
Next, we'll start writing some code to build the smart camera.
Note:
If you think the above thonny command looks weird, you're right, but
those extra
instructions are helpfulWhen you launch an
app like Thonny from the command line, by default, it runs in the "foreground" of the
terminal, which means you cannot issue new commands until that app quits (try running
just thonny smart_camera.py to see for yourself). So, by adding
&>/dev/null & at the end, we specify that any terminal output
should be discarded into the "null" file (it's ignored) and the app process
should run in the "background" so we can get the command prompt
back.. Alternatively, you can run xdg-open .
(include the period) to open the current directory in the File Manager,
and then you can double-click the smart_camera.py file to open
it in Thonny.
1. Get to know BBox
For this project (and the next one), you need to know the location of a detected object inside the image. To help with that, we'll use the BBox API from PyCoral, which specifies a set of bounding-box coordinates. The code you're looking at now doesn't use BBox because the vision.draw_objects() function actually draws the boxes around each face. So let's take a look at how we can get the bounding-box details for our own purposes.
The detector.get_objects() is what actually detects objects using an ML model, and it returns a list of the objects it found (as Object objects). So let's look at this by printing the function's returned value:
In your editor, add a line to print the faces results:
forframeinvision.get_frames():faces=detector.get_objects(frame,threshold=0.1)print(faces)# You add this line
Press CTRL + R to run the script from Thonny. After a moment, the video should appear and you will see lots of results like this in the Thonny shell:
What this means is the get_objects() function returns a list (denoted by the square brackets) with objects (each defined by the Object class) that hold members named id, score, and bbox:
The id is the type of object detected (in this case, the model detects only faces so it's always zero).
The score is the model's confidence about the detection (in this case, the model is 79% sure it sees a face).
The bbox is an BBox object that specifies the bounding box coordinates—that is, the face's location in the image.
Note: To quit the program, either press Q
when the video window has focus, or press
Stop in Thonny (if you launched it from Thonny).
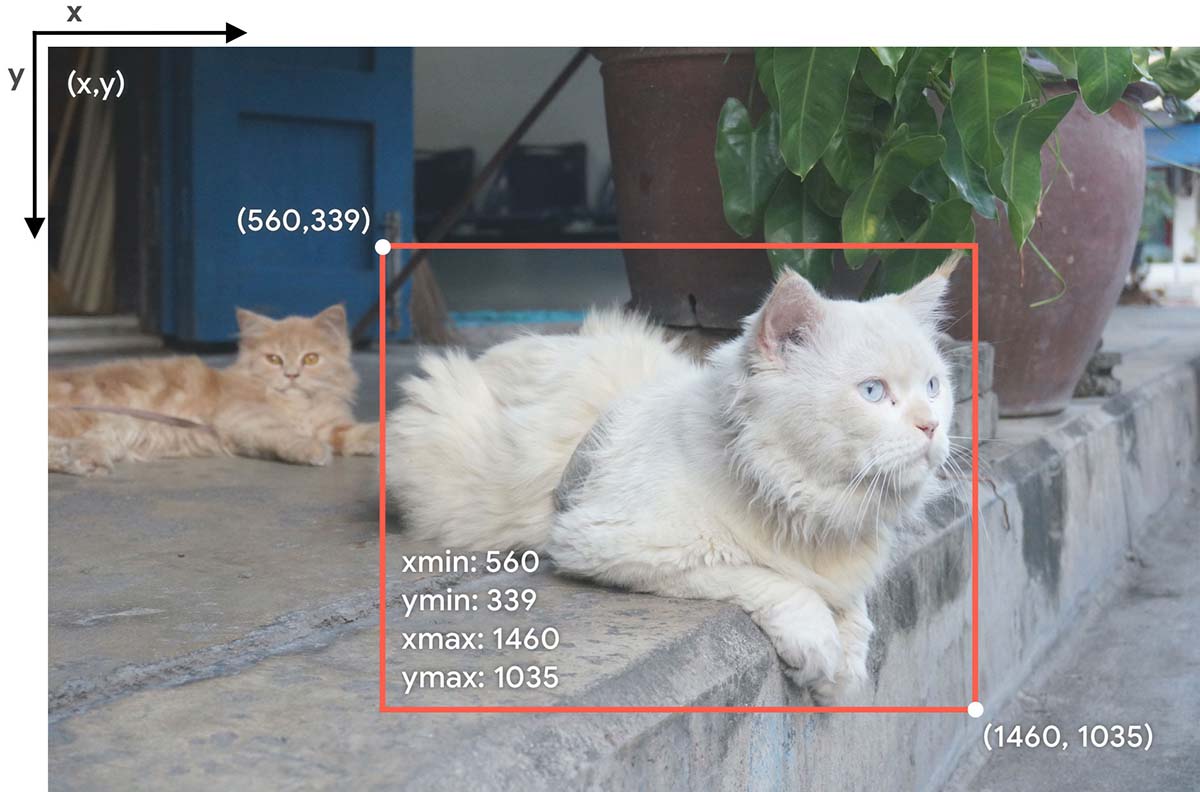
As you build programs using object detection models like this one, you'll find this BBox object and its functions to be very useful. For now, let's focus on the member variables within it that specify the box coordinates:
xmin is the box's left-most point.
ymin is the box's top-most point.
xmax is the box's right-most point.
ymax is the box's bottom-most point.
Just remember that the x and y coordinates begin at the top-left corner.
Now that you understand the bounding-box details, you can do all sorts of stuff by reading the location of each detected object from the BBox API.
2. Draw a rectangle
You can also use the BBox API to define your own rectangles. So let's draw a rectangle that specifies the center region where all faces must be in order to trigger a photo.
First import this API at the top of the file:
frompycoral.adapters.detectimportBBox
Then, instead of specifying a fixed rectangle size, we'll make our rectangle proportional to the image provided by the camera, which is specified by vision.VIDEO_SIZE. And you need to define this box only once, so add the following code before the for loop:
# Define the auto shutter detection zonewidth,height=vision.VIDEO_SIZExmin=int(width*0.25)xmax=int(width-(width*0.25))ymin=int(height*0.2)ymax=int(height-(height*0.2))camera_bbox=BBox(xmin,ymin,xmax,ymax)
Notice that each coordinate is cast to an integer with int() because when the time comes to draw the rectangle, the pixel coordinates cannot be float values (fractional pixel locations don't make sense).
Then to draw this rectangle on the video, call the vision.draw_rect() function every time the for loop provides a new frame, passing it the frame to draw on and the BBox to draw. So the for loop should now look like this:
forframeinvision.get_frames():faces=detector.get_objects(frame,threshold=0.1)print(faces)# You can delete this line nowvision.draw_objects(frame,faces)vision.draw_rect(frame,camera_bbox)
You can run the script again and you should see both a red box around your face and a blue box in the center of the video. This blue box is what we'll use to detect when faces are near the center.
3. Check if a face is inside the rectangle
Assuming your face is the only one visible in the room, you now have two BBox objects during each loop (the BBox returned by get_objects() and the BBox you just created). So you just need to figure out if the face box is inside the camera box.
Here's a function to do just that—put this just above the for loop:
Then at the end of the for loop, you can detect if a face is inside the camera detection box
by passing the face BBox and camera BBox to box_is_in_box().
Notice that because get_objects() returns a list of detected objects (faces), in this code
we assume there is only one face, so we get the first item in the list with faces[0] (zero is the
index position of the first list item):
forframeinvision.get_frames():faces=detector.get_objects(frame,threshold=0.1)vision.draw_objects(frame,faces)vision.draw_rect(frame,camera_bbox)iffacesandbox_is_in_box(faces[0].bbox,camera_bbox):print("Face is inside the box!")
Hint:
Later on, if you want to make this work with multiple faces, you should create a loop
that calls box_is_in_box() for every item in the faces list
(instead of calling it just once with faces[0]).
4. Take a picture
Instead of giving you all the code for this project, we'll leave this part up to you.
But our API does provide another function that will help: vision.save_frame(). Just call this function anytime during the for loop and pass it a filename and the current frame to save it as a photo. For example:
But there's still more code you need to write to make this work properly, such as:
Count how many faces are detected and make sure each one is inside the box.
Do you want the saved photo to include the bounding boxes? Maybe don't draw them when you save a photo.
Even when all faces are inside the box, do you want to take a photo every single frame (several times in a second)? Maybe you should to add a time delay between each photo.
We encourage you to try solving these challenges on your own and expand the project with your own ideas. But if you get struck, you can peek at the rest of our finished code in ~/aiy-maker-kit/projects/smart_camera.py.
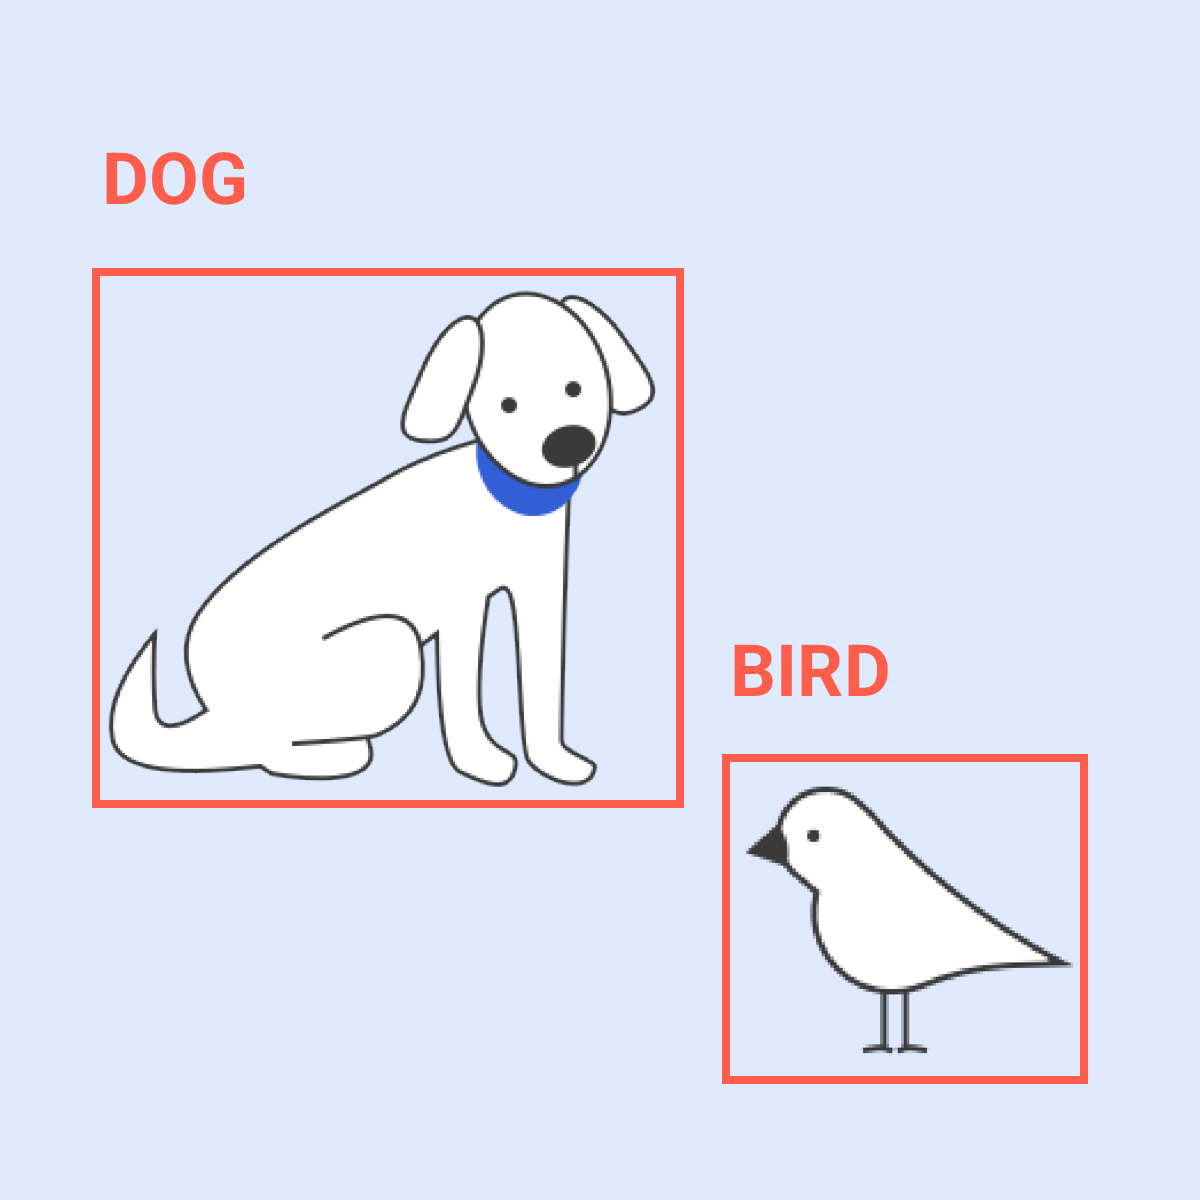
Build a person-detecting security camera
Objective:
Create an app that detects when a person enters a forbidden area.
What you'll learn:
How to read a labels file and filter results so you respond to only certain objects.
How to detect a specific amount of overlap between bounding boxes.
This project has some similarity with the smart camera because you'll inspect the location of
an object. But this project expands on the concepts you already learned because it teaches you
how to handle a model that can recognize lots of different things (not just faces) and you'll
perform more sophisticated bounding-box comparisons.
First, try the object detection demo that we'll use as our starting point:
python3 detect_objects.py
See if it can correctly label your keyboard, cell phone, or scissors.
Remember that each ML model can recognize only what it was trained to recognize. Whereas the previous face detection model could recognize only faces, this model can recognize about 90 different things, such as a keyboard, an apple, or an airplane. To see what objects it was trained to recognize, open the coco_labels.txt file in aiy-maker-kit/examples/models/.
Play with this for a while by showing it different objects that are listed in the labels file (try searching the web for images on a phone or computer, and hold that up to the camera). You'll probably notice the model is better at recognizing some things more than others. This variation in accuracy is due to the quality of the model training. But one thing the model seems to detect consistently well is people.
So let's build a program that responds when a person appears in the image and
detect when they only partially enter an area.
To get started, make a copy of detect_objects.py and open it:
cp detect_objects.py security_camera.py
thonny security_camera.py &>/dev/null &
1. Define a fence region
Just like the smart camera above, your security camera needs a rectangular region that triggers an action when a person enters it. This region is called a fence because it will behave like a virtual fence that detects intruders.
Here's how to define a new BBox for your fence as a proportion of the camera's image size:
# Define the protected fence regionwidth,height=vision.VIDEO_SIZExmin=0ymin=0xmax=int(width*0.5)ymax=int(height*0.5)fence_box=BBox(xmin,ymin,xmax,ymax)
Looking at this code, you should be able to figure out that fence_box is
a bounding-box that occupies the top-left quadrant of the image: the top-left
corner of the box is the top-left corner of the image, and bottom-right corner
is at the middle of the image. If this isn't clear, take another look at the
section above about BBox coordinates.
The id didn't matter for face detection, but now it does matter because it tells us exactly what kind of object the model thinks it found. But the id is just a number, so we need to translate it into a text label. This is easy to do by reading the labels file that belongs to the model: each label is on its own line, and the id number corresponds to the line number (starting at zero for the first line, just like the index position in an array).
But writing code to parse a text file is no fun, so we'll use the read_label_file() function from PyCoral. This function takes the path to the labels file and returns a Python dictionary (a structure of key-value pairs). You can see this line of code in the file already, which then draws boxes and labels for all detected objects. But now we want to inspect the label of each detected object so we can respond only when a person is detected.
To understand what the model actually detected before we draw anything, we need to look at the object ids returned by get_objects() and compare them to the labels returned by read_label_file(). Because read_label_file() provides a dictionary that maps label ids to text labels, all we need to do is call Python's get() method on the dictionary. This method returns the value (the label string) that matches the given key (the label id).
Now, by iterating over all objects returned by get_objects(), we can figure out what is each object with a string comparison:
forframeinvision.get_frames():vision.draw_rect(frame,fence_box)objects=detector.get_objects(frame,threshold=0.4)forobjinobjects:label=labels.get(obj.id)if'person'inlabel:print('A person was detected!')
And you should delete the draw_objects() function so the code ignores
everything that is not a person.
3. Detect an intersection of boxes
Now you know if the camera sees a person, so let's figure out if they entered the security fence area.
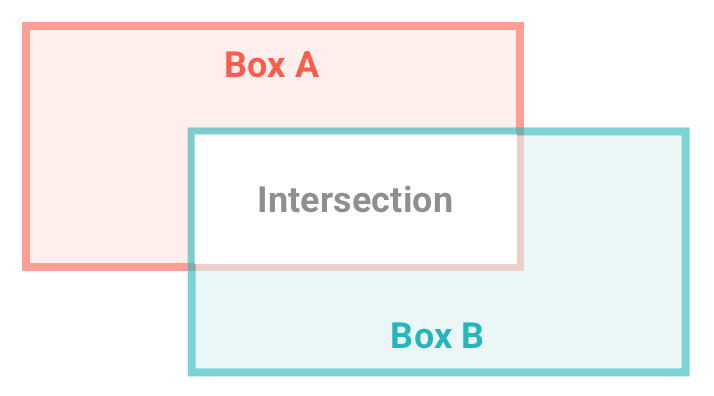
The smart camera above only cared if a face was fully inside a rectangle, but for our security system, we want to know if a person even partially breaches the fence area. To do this, we'll use the BBox.intersect() method, which takes two BBox arguments, compares them, and returns a new BBox that represents the area where those two boxes intersect.
So after you call BBox.intersect(), you have 3 bounding-box objects:
One for the fence area
One for the person
One for the intersection of them both
How you now determine whether to trigger your security alarm depends on how sensitive you want your system to be. For a very sensitive system, you might want to trigger the alarm if there's any intersection at all between them. It also depends on how far away the camera is from the area in question (how big the fence is compared to people in the image).
For this example, let's allow a little forgiveness: We'll allow up to 30% of the person's body to enter the fence; any more and they're classified as an intruder (we merely change the color of their box from green to red, so this is where you can add your own alarm shenanigans).
We calculate the overlap by comparing the total area of the intersection box to the total area of the person box:
That's about it, but there's certainly more you can do to improve your system.
Try it out and see if there are any situations where the system doesn't behave
as expected. For example:
Adjust the fence area to match an area of the room you want to guard.
Adjust the overlap_area math to suit your camera's environment.
Add a comparision between the intersection area and the fence area to account for situations such as when the fence area is small enough to be occluded by the person even if they are not entirely in the fence area (such as when they are very close to the camera).
Add some speakers and play an obnoxious alarm noise!
To see our finished code, open the aiy-maker-kit/projects/security_camera.py file.
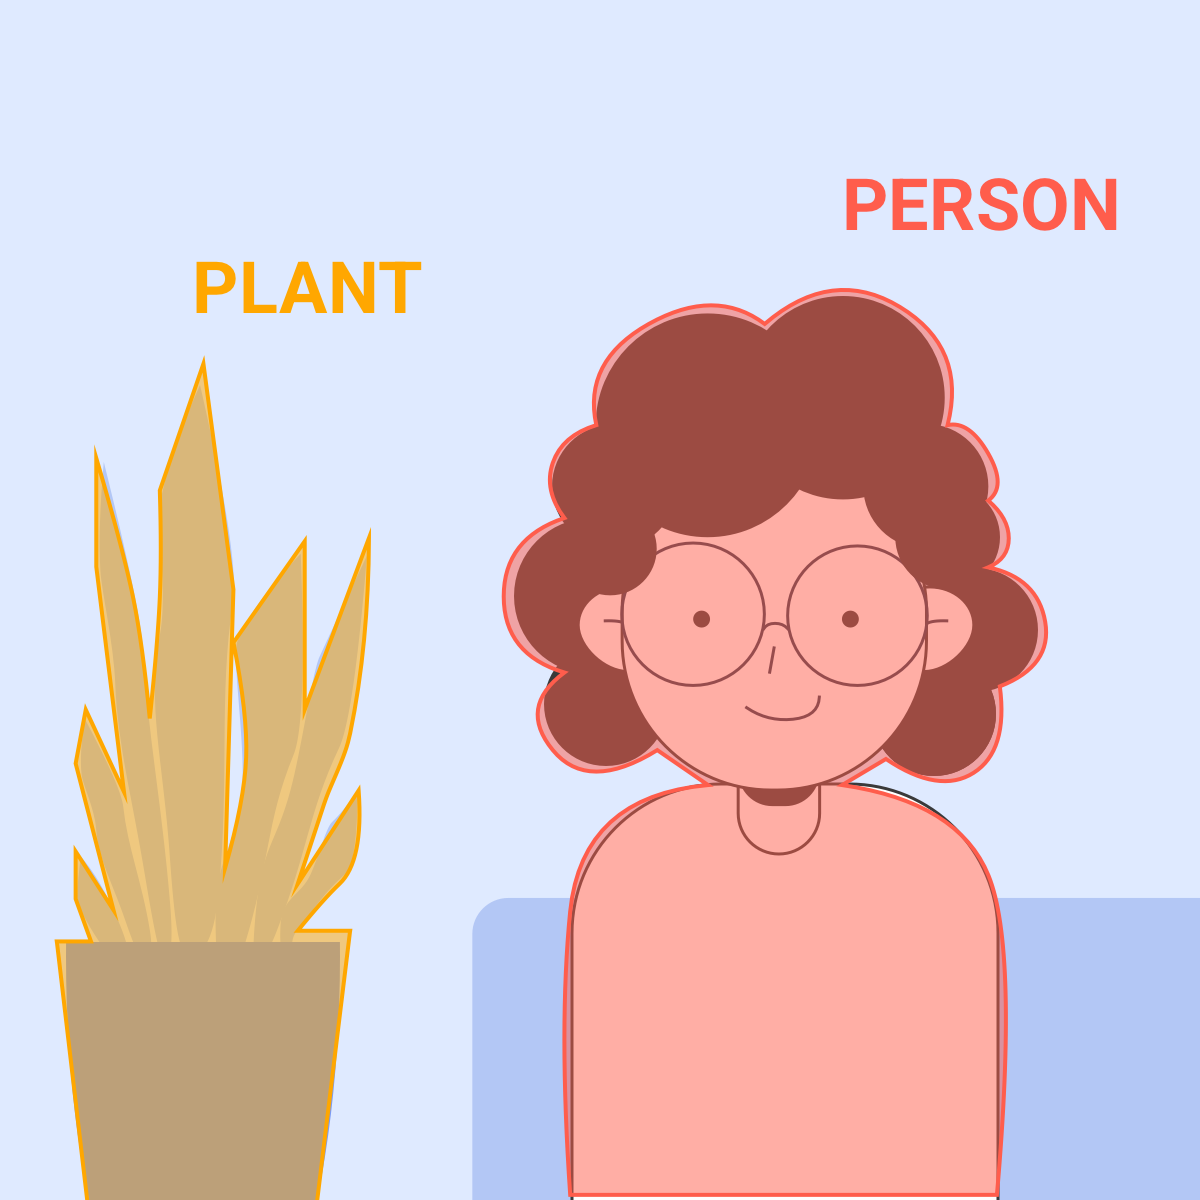
Build a custom image classifier
Objective:
Train an image classification model to recognize new objects (all on the Raspberry Pi).
What you'll learn:
How to create your own image dataset and labels file to train an ML model.
How to train an image classification model on the Raspberry Pi.
The object detection model used in the previous project was trained to recognize only a specific collection of objects (such as people, bicycles, and cars)—you can see all the objects it's trained to recognize in the coco_labels.txt file (about 90 objects). If you want to recognize something that's not in this file, then the model won't work, you would have to train a new version of the model using sample images of the object you want it to recognize.
However, training an object detection model (as used for face and person detection) requires a lot of work to prepare the training data because the model not only identifies what something is, but where it is (that's how we draw a box around each person). So to train this sort of model, you need to provide not only lots of sample images, but you must also annotate every image with the coordinates of the objects you want the model to recognize.
Instead, it's much easier to train an image classification model, which simply detects the existence of certain objects, without providing the coordinates (you cannot draw a bounding box around the object). This type of model is useful for lots of situations because it's not always necessary to know the location of an object. For example, an image classification model is great if you want to build a sorting machine that identifies one item at a time as they pass the camera (perhaps you want to
separate marshmallows from cereal).
There are several ways you can train an image classification model that works with the Coral USB Accelerator, and we've linked to some options below. However, our favorite (and the fastest) method is to perform transfer learningTraining an ML model ordinarily takes a long time and requires a huge dataset. However, transfer learning allows you to start with a model that's already trained for a related task and then perform further training to teach the model new classifications but with a much smaller training dataset. on the Raspberry Pi, using images collected with the Pi Camera.
So that's what we're going to do in this project: collect some images of
objects you want your model to recognize, and then train the model right on
the Raspberry Pi, and immediately try out the new model.
1. Prepare your photoshoot
Find a few objects you can place in front of your camera.
Anything will do for your first attempt, because you'll soon understand how easy it is to retrain the model again and again. For example, grab a shoe, a bottle, a game controller, a figurine, or a potted plant. Try at least 3 objects, but no more than 9.
Orient the Pi Camera so it's facing a mostly-empty background. The camera's field of view should not be filled with complicated shapes like a large bookshelf or a messy desk. You should also stay out of the pictures as much as possible.
Make sure you have good lighting so the camera can clearly see the objects you put in front of it:
Good: A light source coming from behind the camera or from the sides.
Bad: A strong light source coming from behind the object, placing the object in shadow.
2. Collect the training images
To simplify this part, we've created a camera program that captures photos and organizes them into separate folders based on the number key you press to take the photo. For example, when you press 1, it takes a picture and saves it in a folder named "1", and when you press 2, the photo is saved in folder "2". This way, you'll have all the photos for each object in a separate folder. But actual names are certainly better than numbers for folder names, so we'll create a labels file that maps each number to an object label.
Create the labels file:
On your Raspberry Pi, open the ~/aiy-maker-kit/examples/ folder in the File Manager, and then right-click on an empty space in the window and select New File.
Name the file "labels.txt" and click OK.
Double-click on the new file to open it in the text editor.
On the first line, type "Background" (do not include quotation marks).
Then for each item you'll use for training, enter its name on a new line (such as "Shoe" or "Bottle").
When you're done, save the file and close the editor.
Open the Terminal, navigate to the ~/aiy-maker-kit/examples/ directory, and start the camera program (it won't take any pictures until you press a number key):
python3 collect_images.py --labels labels.txt
You'll see the camera preview appear on the desktop, and the Terminal prints how each number key maps to each object from your labels file. Notice which number represents each object.
Start by taking pictures of your mostly empty background: (None of your objects should be visible in the camera preview, and you should also not be visible.) Press 0 (the zero key) about 10 times to capture several pictures of your "Background."
Now start with the object represented by number 1: (If you forgot which number is which object, press the H key and the terminal will print the label mapping again.) Place that object in front of the camera and press number 1 just once.
Then reposition the same object so the camera can see it from a different angle (perhaps also move it closer or farther from the camera), then press 1 again. Now repeat this process several times: Move the object slightly and take another picture. Do this about 10 times.
Then go on to object 2, and do the same thing, taking several photos with the object in slightly different positions and visible from different angles. But be sure you never move the camera!
After you've captured several photos of each object, press Q to close the camera.
Open ~/aiy-maker-kit/examples/ folder in the File Manager, and open the new captures folder. Look inside each label directory to review your images and count how many images are in each folder. For the best training results, you should have the same number of images in each folder.
Note: You might notice that the photos created with
collect_images.py are saved in PNG format, instead of JPG, which is often used
for photos. This is because the JPG format is a compressed image format, meaning some image
detail is lost in order to make the file size smaller, while PNG format is lossless and all
image detail is retained. Although you might not be able to see the difference (which is why
JPG is such a popular image format), our machine learning model can be sensitive to these
compression details, so we want to train our model with the uncompressed data that's provided
by a PNG file.
3. Retrain the classification model
Now you can train the model with just this command:
python3 train_images.py -l labels.txt
By default, the script expects your training images to be in the captures directory. If you renamed that directory, you need to specify the name with an extra --capture_dir argument.
After a moment, the training script begins and it prints a line for every image in the training dataset. For example:
When this finishes, your retrained model is ready to perform image classifications, saved at ~/aiy-maker-kit/examples/my-model.tflite.
As for what's being printed here, you probably recognize the image file name, but the numbers on the right are more complicated and you can just ignore them. But if you're curious, the numbers are an abbreviated view of the "image embedding" (it's truncated by the ellipsis; the full length is 1,024 numbers): It's a type of tensor that provides valuable information about the image features. This tensor comes out of the base model (upon which we're performing transfer learning) so it's actually the data we start with to learn similarities between images within each of our classes (such as how all the "Can" images are similar), and learn the differences across classes… And because the base model has already done all the work to calculate these image features, the learning that remains to be done for our new images happens very fast.
4. Run the new model
Now you can run the model and evaluate how well it has learned to recognize the objects you provided for training. Just run this script that performs image classification and specify the new model and your labels file:
As long as the lighting conditions and camera perspective match the settings from when you captured your training images, it should correctly label each object on the screen, along with the confidence score.
Build a pose classifier
Objective:
Train a pose classification model to recognize your body poses.
What you'll learn:
The difference between pose detection and pose classification.
How to collect a large image dataset.
How to train a TensorFlow Lite model using Google Colab.
If you finished the project above to train an image classification model then you've taken your first big
step into the world of machine learning, because you actually performed
the "learning" part of machine learning (usually called "training"). In this
next project, we're going to continue with model training, but things are going
to get more interesting (and a bit more complicated).
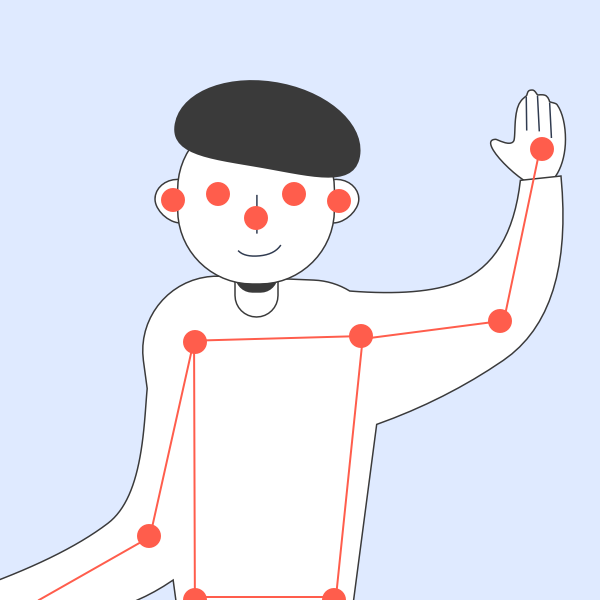
In this project, we're going to train a brand new model that can recognize a
variety of different poses that you make with your body. The basis for our pose
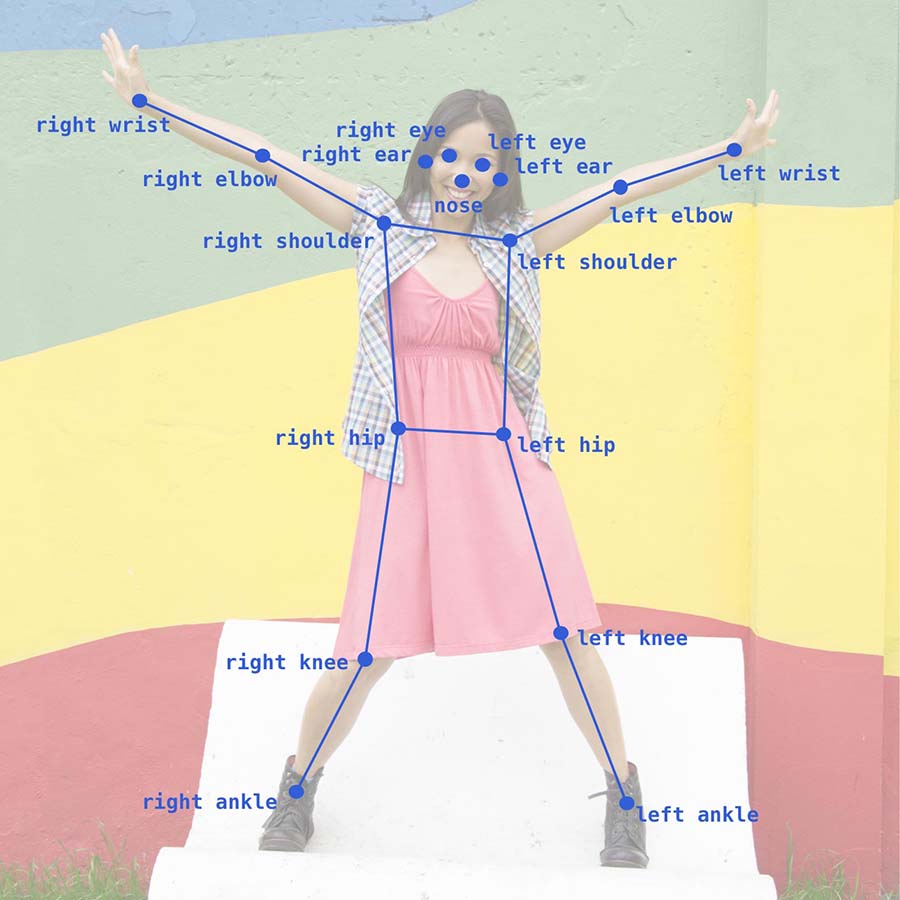
classification model is the output from a pose detection model (also called a
pose estimation model), which is trained to identify 17 body landmarks
(also called "keypoints") in an image, such as the wrists, elbows, and
shoulders, as illustrated below.
Photo credit: imagenavi / Getty Images
This pose detection model is already trained and we won't change it, but it only identifies the location of specific points on the human body. It doesn't know anything about what sort of pose the person is actually making. So we're going to train a separate model that can actually label various poses (such as the name of yoga poses) based on the keypoints provided by the pose detection model.
To get started, try the pose detection model:
python3 detect_poses.py
Orient your camera and step away so it can see all or most of your body. Once
it's running, you should see a sort of stick figure drawn on your body.
To understand this a little better, open the detect_poses.py file and
update it so it prints the pose data returned by get_pose():
Now when you run the code, it prints a large array of numbers with each
inference, which specifies the estimated location for 17 keypoints on the
body. For each keypoint there are 3 numbers: The y-axis and x-axis coordinates
for the keypoint, and the prediction score (the model's confidence regarding
that keypoint location). The draw_pose() function simply uses that data to
draw each point on the body (if the prediction score is considered good enough).
This is very cool on its own, but we want to create a program that
actually recognizes the name of each pose we make.
To do that, we'll train a separate model that learns to identify particular
patterns in the keypoint data as distinct poses. For example, the model might
learn that if both wrist keypoints are above the nose and elbow coordinates,
that is a "Y" pose. So, this model will be trained, not with images from
the camera, but with the keypoint data that's output from the pose detection
model above.
So let's start by collecting images of these poses…
1. Collect your training data
You can choose whatever poses you want your model to recognize, but just
as an example, we'll train our model to recognize some
aircraft marshalling
signals. (These are the signals you might see from folks on the airport tarmac
to communicate with pilots.)
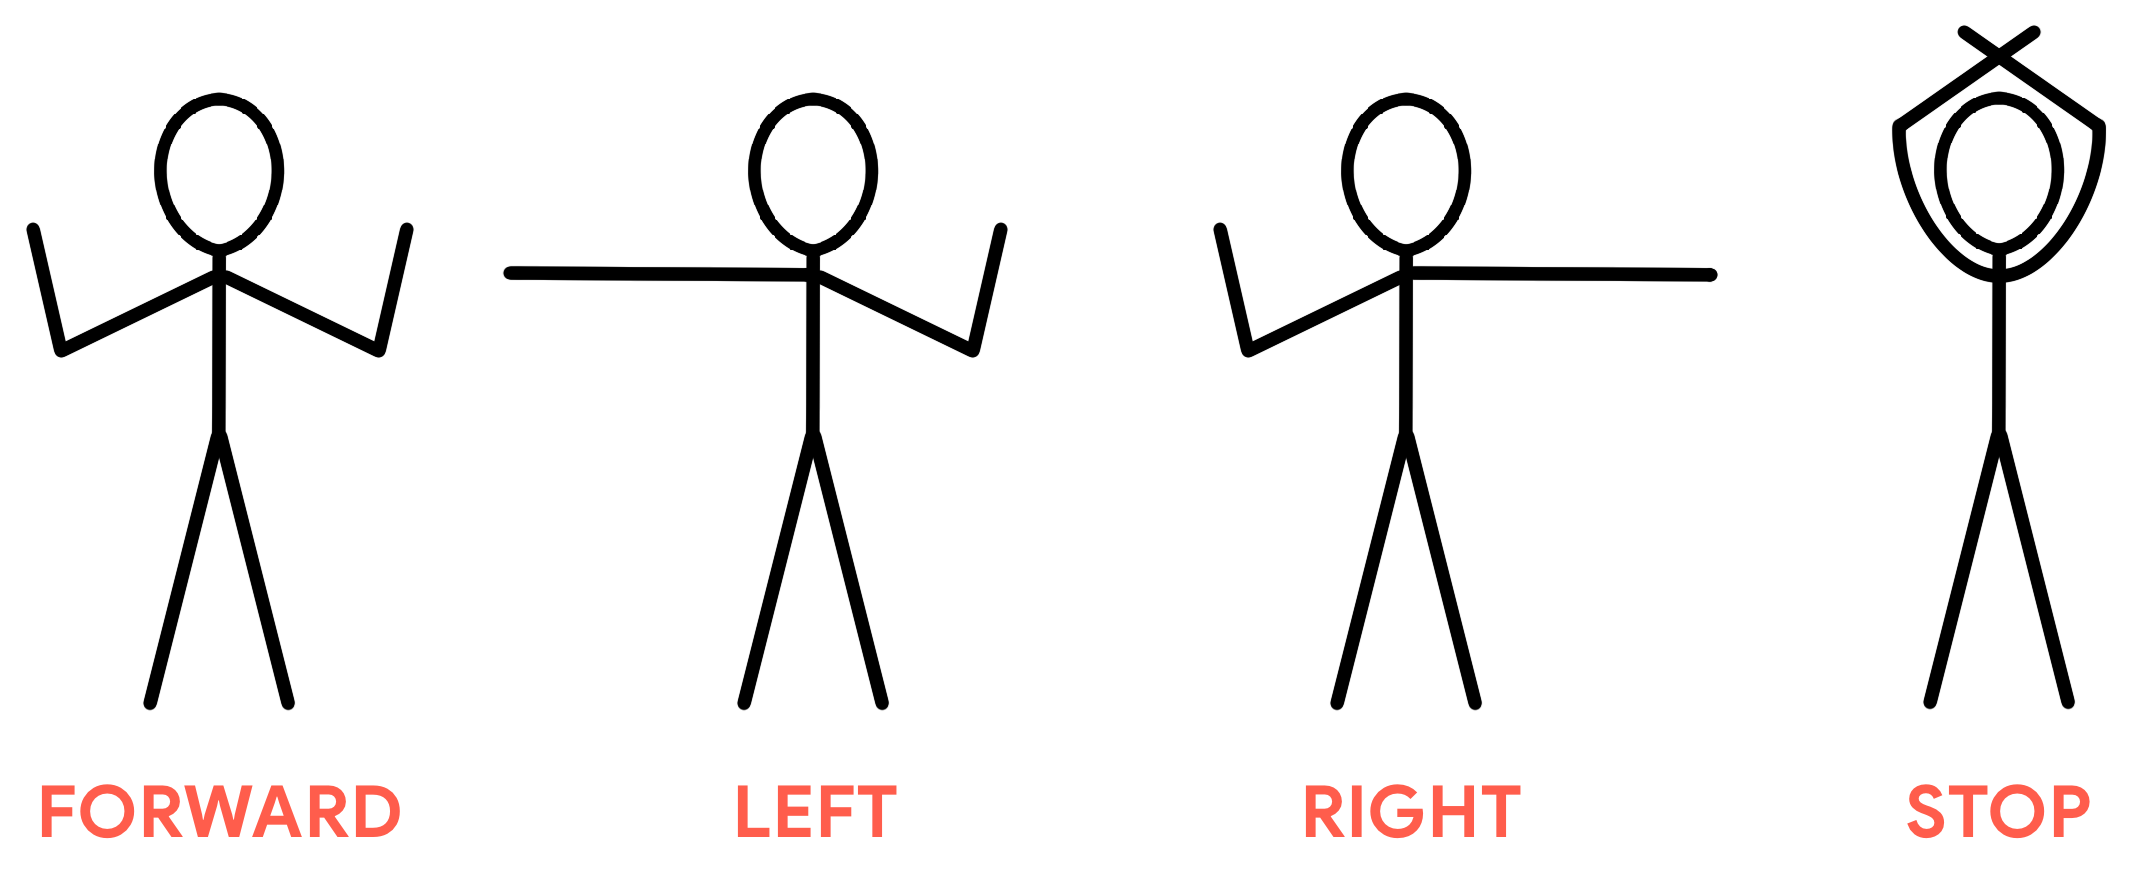
Here are the four marshall poses we're going to teach our model:
Note: These poses are illustrated from the perspective
of the observer. So, to indicate "left," you actually hold your right arm
straight while your left is bent upward. (Also, these poses are simplified
because real aircraft marshall signals involve movement, but our model can
recognize only stationary poses.)
To train this pose classifier, we need a sample dataset much bigger than the one we used for the image classifier. So instead of just 10 images, let's capture 80 images for each pose. So instead of capturing one image at a time, we'll capture a few photos every second by adding the --continuous argument when we run collect_images.py.
And to be sure we don't get these images mixed up with the others from the previous project, we'll specify a new images directory name with --capture_dir argument.
So here are the steps to collect your pose dataset:
Create the labels file, like you did for the image classifier, but name it pose_labels.txt:
Position the camera so it can see your whole body (or at least everything above your thighs). You'll have three seconds to move away from your keyboard and get into position.
Note: While the camera is capturing images, do
not stand still. It's important that you move around the frame a little
and also reposition your arms slightly while still holding roughly the same
pose.
Similar to the "Background" images you created before, start by taking pictures of yourself not posing: Press 0 (the zero key) and keep your arms down while the camera takes pictures of you.
Because the camera automatically captures 80 photos, you need to press each number only once.
Now collect pictures for each pose. (If you forgot which number represents each pose, press the H key and the terminal will print the label mapping again.)
When you're all done with each pose, press Q to stop the camera, and then go back to the Terminal and compress all the new images into a ZIP file:
zip -r poses.zip poses
You need the images zipped up in order to upload them to the model training script in Google Colab...
Note:
As mentioned above, the pose classifier will be trained using only the
pose keypoint data, not these images. We're merely uploading the images to
Google Colab so we can convert all the images into keypoint data using
a highly accurate pose detection model.
2. Train the model in Google Colab
What is Google Colab?
It's a web-based development tool (built with Jupyter notebooks that runs Python scripts
on Google servers, providing you a predictable development environment that
might be more powerful than your local CPU (it's definitely more powerful
than the Raspberry Pi). Google Colab is a great platform for sharing Python
scripts that train machine learning models, with documentation included in
the script file (called a "notebook"). You can edit the notebook code from
your web browser, immediately run that code, and make a copy of the
notebook to save your changes.
Note:
This procedure requires a Google Account to log into Google Colab.
If you don't have one, create one here.
On your Raspberry Pi, open the Web Browser from the task bar.
In the browser address bar, enter
g.co/coral/train-poses.
This redirects you to our model training notebook on colab.research.google.com.
If this is your first time using Google Colab, take a moment to look around the interface, and watch this short video to learn more about how it works, but we'll walk you through each step required for this project...
Click Sign in at the top-right corner of the web app. It will then ask if you want to leave the site, so click Leave and it will take you to the login screen.
Log in using a Google account and then it will take you back to the Colab notebook.
Below the Sign in button, click Connect. A dialog might appear asking if it's okay for Colab to show notifications, such as to notify you when the script completes—you can either allow or deny this permission.
In the Table of contents panel on the left side, click Part 1: Preprocess the input images to jump to that section.
There are a few drop-down options in this section. Click the drop-down for use_custom_dataset and set it to True. The other options should be set False.
Click the Files tab on the left (folder icon) and then click Upload to session storage (file icon).
Select the poses.zip file you created in the previous section, and wait for the upload to complete. You'll see a circular progress indicator at the bottom of the left panel.
Scroll past the notebook's instructions to find a code block that begins with if use_custom_dataset. Here, you need to edit a couple of lines to specify the name of your ZIP file and images folder name:
Change YOUR_DATASET_ARCHIVE_NAME.zip to poses.zip.
Change YOUR_DATASET_DIR_NAME to poses.
In the Google Colab toolbar at the top, click Runtime > Run all.
The notebook is now running on Google servers to train a new TensorFlow model using your pose images!
This should take only about 5 minutes to complete. Just make sure not to close the web browser where Colab is running.
When the notebook finishes training the model, it automatically downloads the TensorFlow Lite model and the associated labels file in a ZIP file.
3. Run the pose classification demo
Now that you've trained a new pose classification model, we just need to move the model and labels files into our project directory, and then we can run the pose classification demo that will print the labeled poses onto the screen:
In the same Terminal window where you zipped up the pose folder, you can now unzip the file downloaded from Google Colab and save them to the ~/aiy-maker-kit/examples/models directory:
unzip ~/Downloads/pose_classifier.zip -d models
Now run the pose classifier script, which is already coded to look for the pose_classifer.tflite and pose_labels.txt files in the models directory:
python3 classify_pose.py
Now strike one of the poses to signal forward, left, right, or stop, and you should see the pose label appear on the video display.
Note: Be sure your camera is oriented in the same
position and you stand in the same location that you used when you captured
your training images.
Build a voice-activated camera
Objective:
Create an app that takes a picture in response to a voice command of your choice.
What you'll learn:
How to train a speech recognition model with Teachable Machine.
How to take a picture using the picamera API.
In this project, we'll train an audio classification model to recognize
new speech commands. There are lots of things you can build that respond to voice comamnds,
but we'll start with a voice-activated camera.
Before we begin, let's quickly discuss what goes into and comes out of the audio model. For
comparison, the input for the previous image ML models is simple: they take an image. Even when
using an object detection model with video, the model takes just one image at a time and performs
object detection, once for every frame of video. But audio is a time-based sequence of sounds,
so you might be wondering how we put that kind of data into the model.
First of all, how an audio model receives input and provides results depends on the type of task you
want to perform. For example, a model that performs voice transcription (speech to text)
is very different from a model that recognizes specific words or phrases
(such as "Hey Google"). Our model is the second type; it will recognize only specific words or
phrases. In fact, it can recognize only speech commands or sounds that fit within one second of
time. That's because the input for our model is a short recording: the program listens
to the microphone and continuously sends the model one-second clips of audio.
What later happens inside our speech recognizer model is similar to what happens in one of the image
classification models, because the one-second audio clip is first converted into an image. Using a
process called fast fourier transformation, the model creates a
spectrogram image, which provides a detailed image
representation of the audio signal in time. Though you don't need to understand how this works,
it's useful to simply know that the audio model actually learns to recognize different sounds by
recognizing differences in the spectrogram image. Then the model outputs a classification
(such as "on" or "off") with a confidence score (just like an image classifier or object
detector).
So, to create our own speech recognizer, we need to record a collection of one-second samples
for each word or phrase we want to teach the model. When the training is done, our program will
repeatedly feed one-second sound recordings to the model and the model will do its best job to
predict whether we said one of the learned commands.
1. Test the microphone
This is the first time we're using the microphone, so let's make sure it's
working well.
Make sure the microphone is completely plugged into a USB port on your
Raspberry Pi.
Run this command in your terminal (that's a lowercase "L", not a one):
arecord -l
You should see your USB device listed like this:
**** List of CAPTURE Hardware Devices ****
card 2: Device [USB PnP Sound Device], device 0: USB Audio [USB Audio]
  Subdevices: 1/1
  Subdevice #0: subdevice #0
Now let's record a few seconds of audio. As soon as you run the following
script, watch the terminal output and say something into the microphone when it
prints "Now recording."
cd ~/aiy-maker-kit
python3 scripts/test_mic.py
To play to your recording, you need to plug in headphones or speakers
to the headphone jack on the Raspberry Pi. Then double-click the test.wav
file saved in the /home/pi/aiy-maker-kit/ folder. To get there, you can open
the current path in the File Manager with this command:
xdg-open .
If the recording is too quiet, you can increase the microphone
sensitivity as follows:
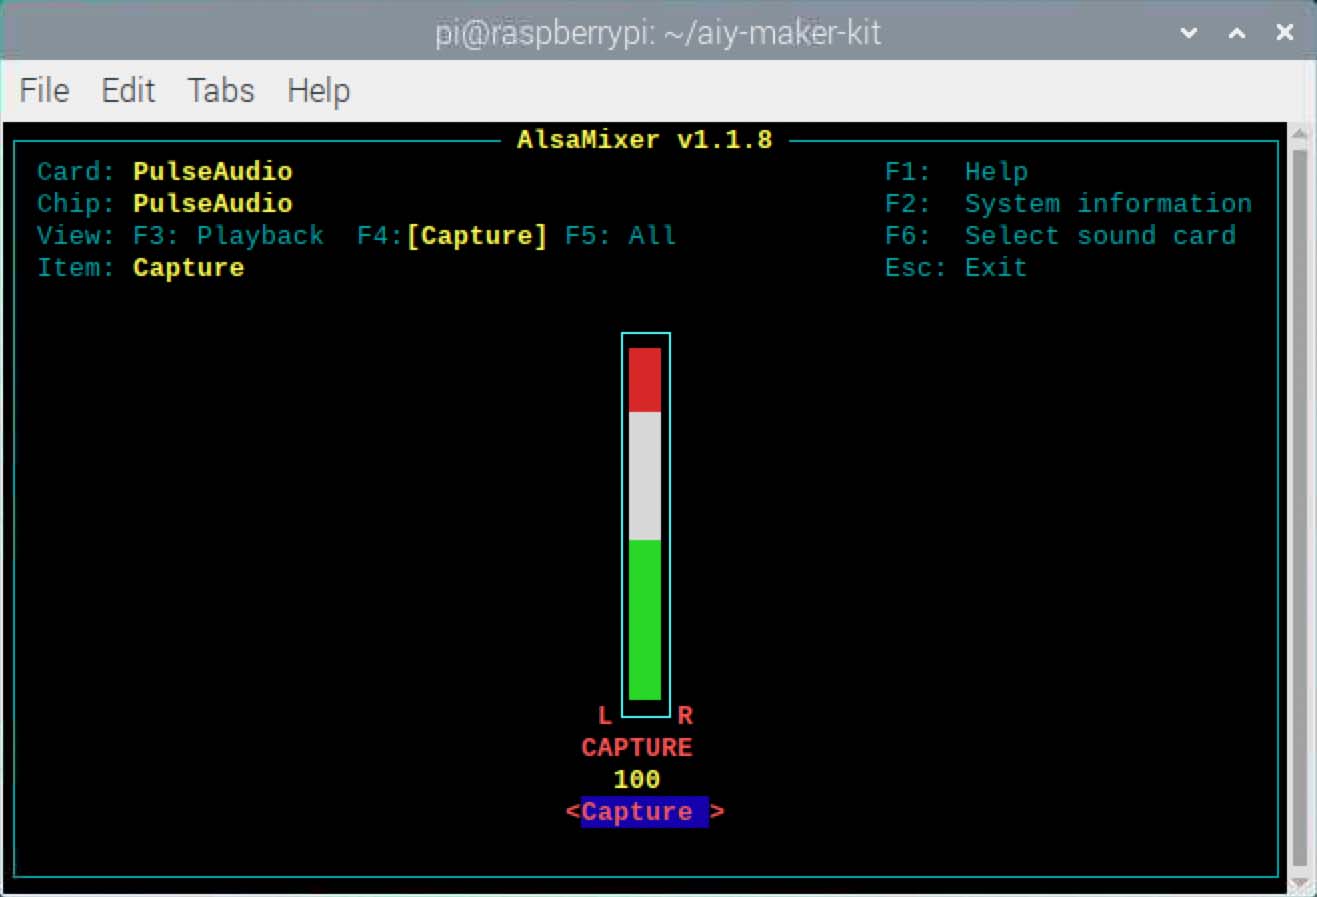
Open AlsaMixer in the terminal with this command:
alsamixer
When AlsaMixer appears, press F4 on your keyboard to switch
to the capture levels.
Press the up arrow on your keyboard to increase the level.
You can increase it as high as you want (up to 100, as shown in the
screenshot below), but this also increases any white noise produced by
the microphone (which is common with low quality microphones). The
extra noise should not be a problem for our machine learning project,
though, because as long as the noise is present in the training
samples, the model will learn to ignore it (or consider it part of
the "background" noise).
Now run the test script again to check the results.
python3 scripts/test_mic.py
2. Train a new model
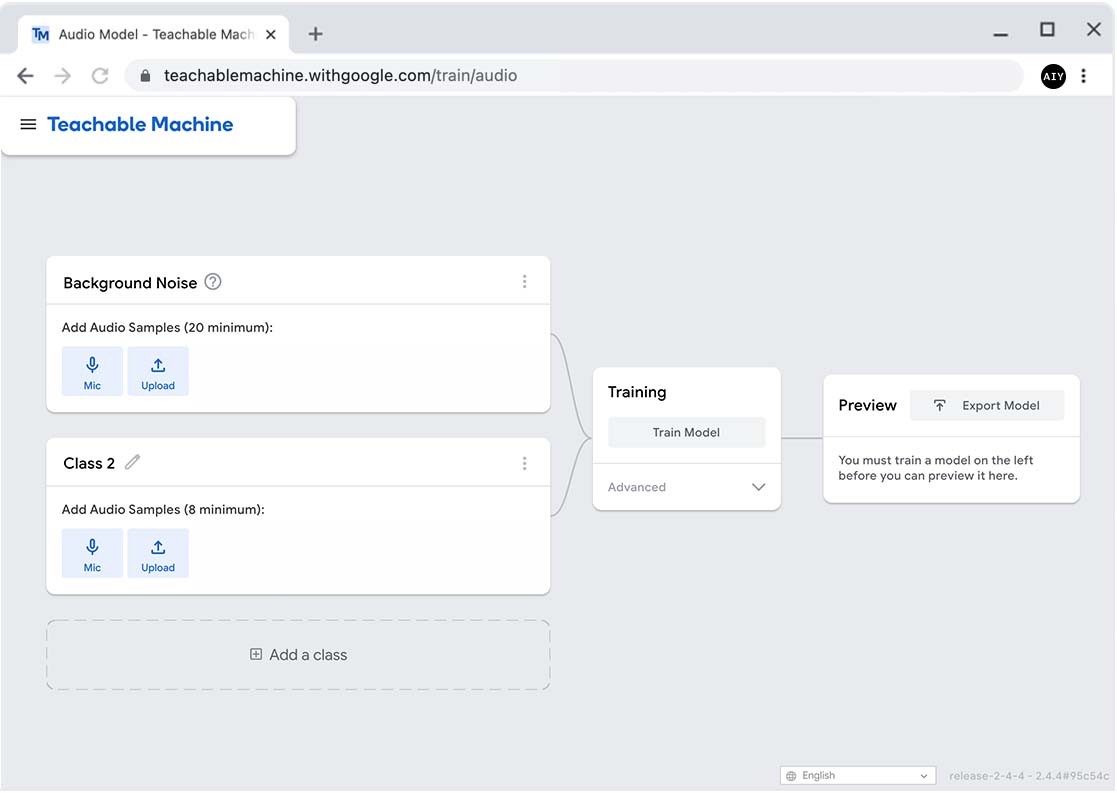
Training a custom model has never been easier than this: We're going to use a web app called
Teachable Machine to record samples for training, and then train the model
with the click of a button.
To get the best results from your trained model, it's important that you capture training samples
that are very similar to (if not identical to) the type of data you will feed the model when
you perform predictions. This means, for example, you should record the training samples in the
same environment and with the same microphone you will use when running the model. Thus, we
recommend you use your Raspberry Pi with the connected microphone to perform the following
sample collection.
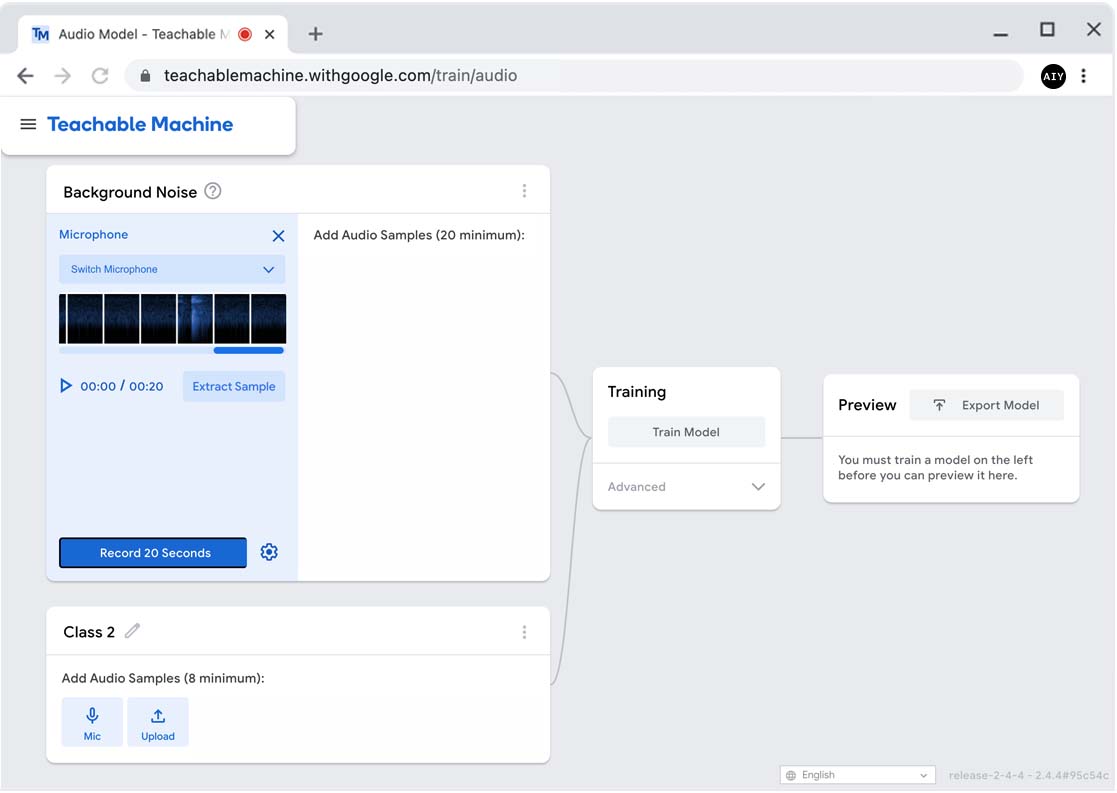
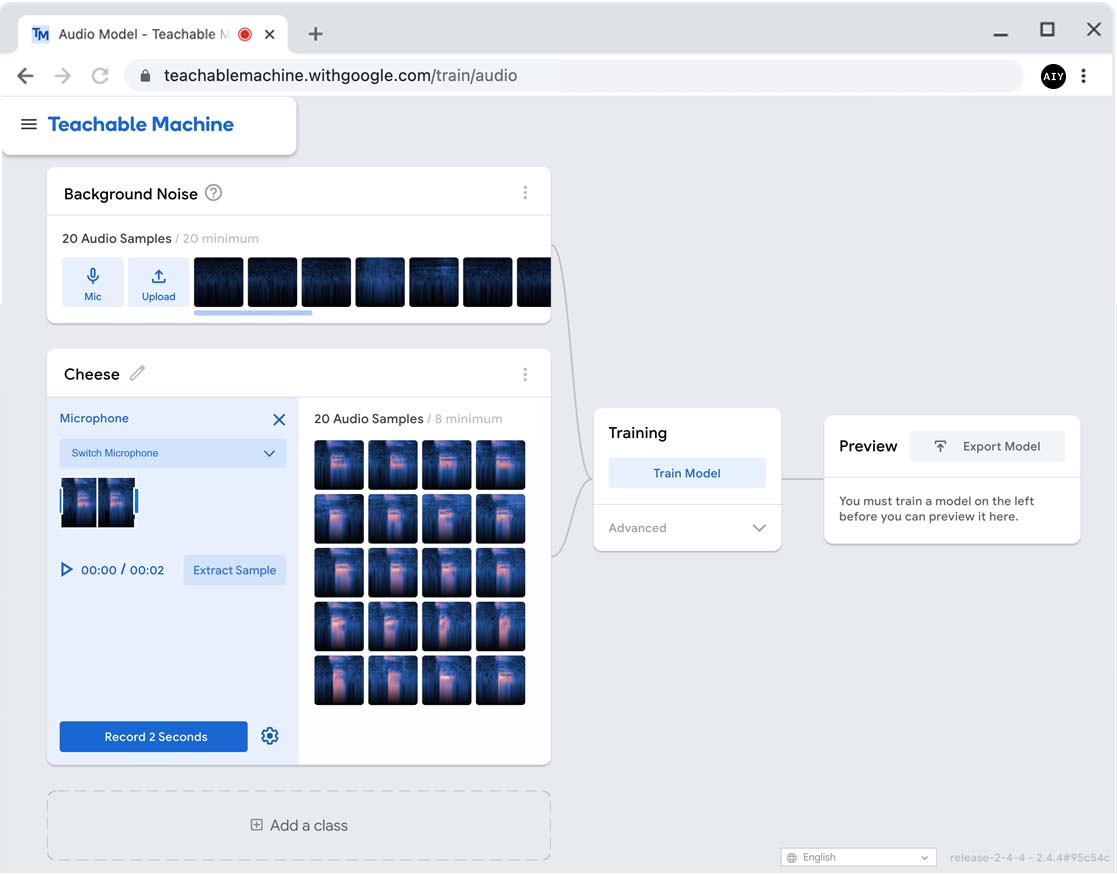
Click Record 20 Seconds and then don't speak while it records.
When it's finished recording, click Extract Sample.
It will convert the 20-second recording into 20 one-second samples.
Record the first speech command
In the second panel, click Class 2 and rename it to the first voice command, "Cheese".
Click Mic to open the recorder.
This time, it will record just 2 seconds at a time, and then split that into
1-second samples. So for each recording, you need to say "cheese" twice.
Get ready... As soon as you click Record 2 seconds, you need to say "cheese" once
and then say it again right after the cursor passes the middle marker. Give it a try.
The recorded sample shows the spectrogram of your recording, so if you timed it well,
you should see the bright color when you said "cheese" on the left and right side. If either
"cheese" recording overlaps the white middle line, click Record 2 Seconds to try again.
If the "cheese" samples look good, click Extract Sample and the recording will be
split into separate samples on the right side.
Repeat steps 3 and 4 nine times so that you get a total of 20 audio samples on the right.
The more samples you record, the more accurate your model becomes. For this project,
20 samples should work fine.
Tip: Each time you record yourself, adjust your pronounciation
slightly (for example, say it faster/slower and with a higher/lower pitch). This will help
the model learn to recognize the same word even when said in a different manner. You can
make your model even better if you get samples from several different people.
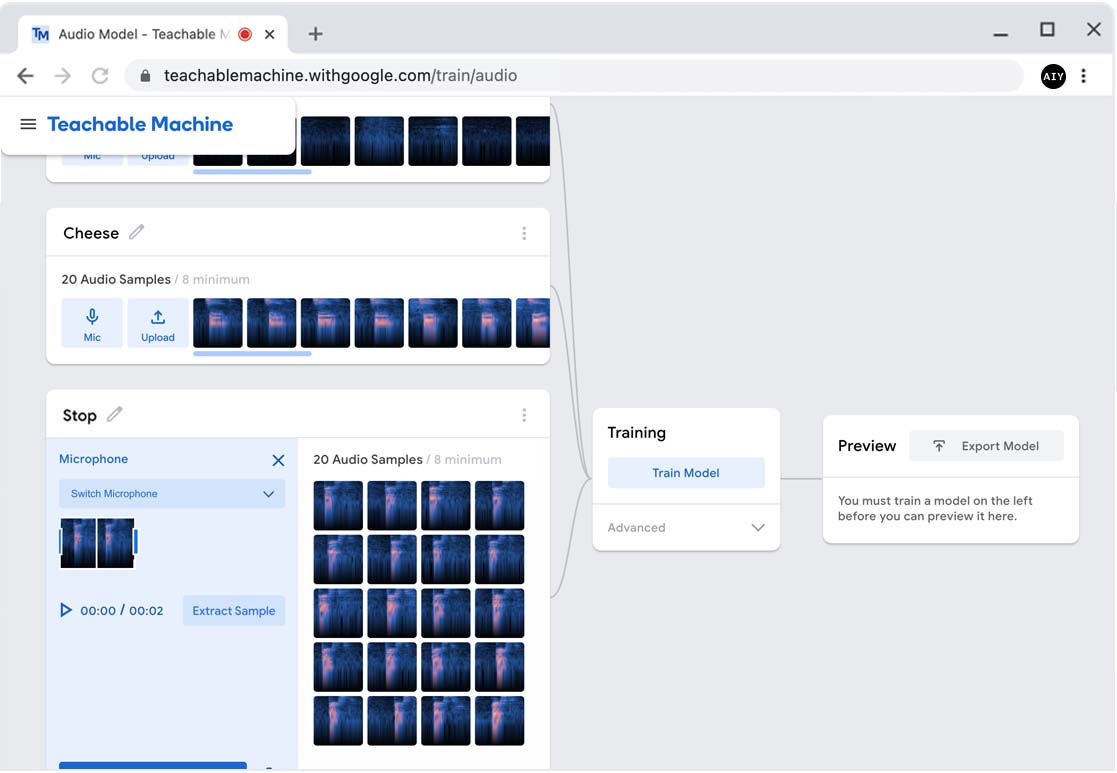
Record another speech command
You can add as many other speech commands as you want. For this project, let's do one
more. The "Cheese" command will take a photo and then keep listening for more
commands, so let's add the ability to quit the program when we say "Stop."
Below the Cheese panel, click Add a class.
Click Class 3 and rename it "Stop."
Repeat the steps above to record samples.
As before, perform 10 recordings (each time, say "Stop" twice) so you get a total of 20 audio
samples.
Train and review the model
Click Train Model.
In less than a minute, the model will be ready.
Teachable Machine then starts running the model by listening to your microphone and
passing one-second clips to the model.
Say "Cheese" and "Stop" or whatever else you recorded to see how well the
model recognizes each command.
If you think the model could be better, you can record more samples and/or add more classes,
and then click Train Model again.
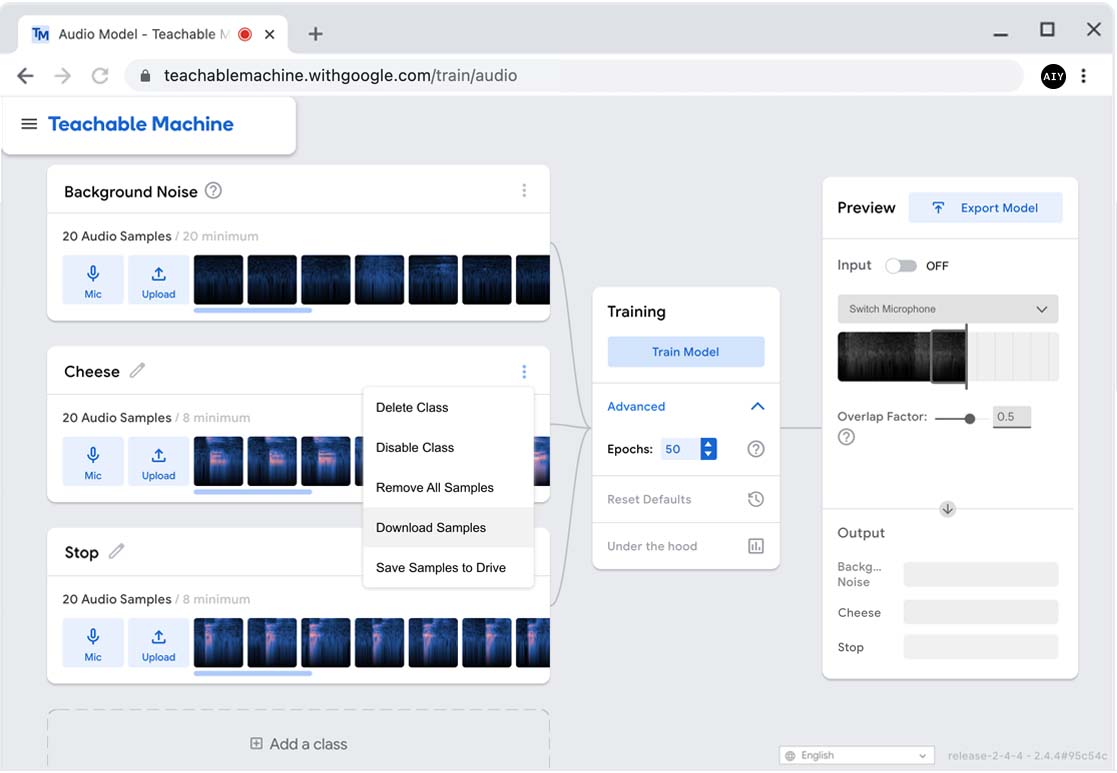
Note: The model always performs inference using one second of audio,
but the preview includes an option to adjust the
overlap factor, which is set to 0.5 (half a second) by default. This means, instead of
recording one second at a time and sending data to the model just once per second, it
records one-second samples that overlap each other by a half second, thus sending data
to the model every half second.
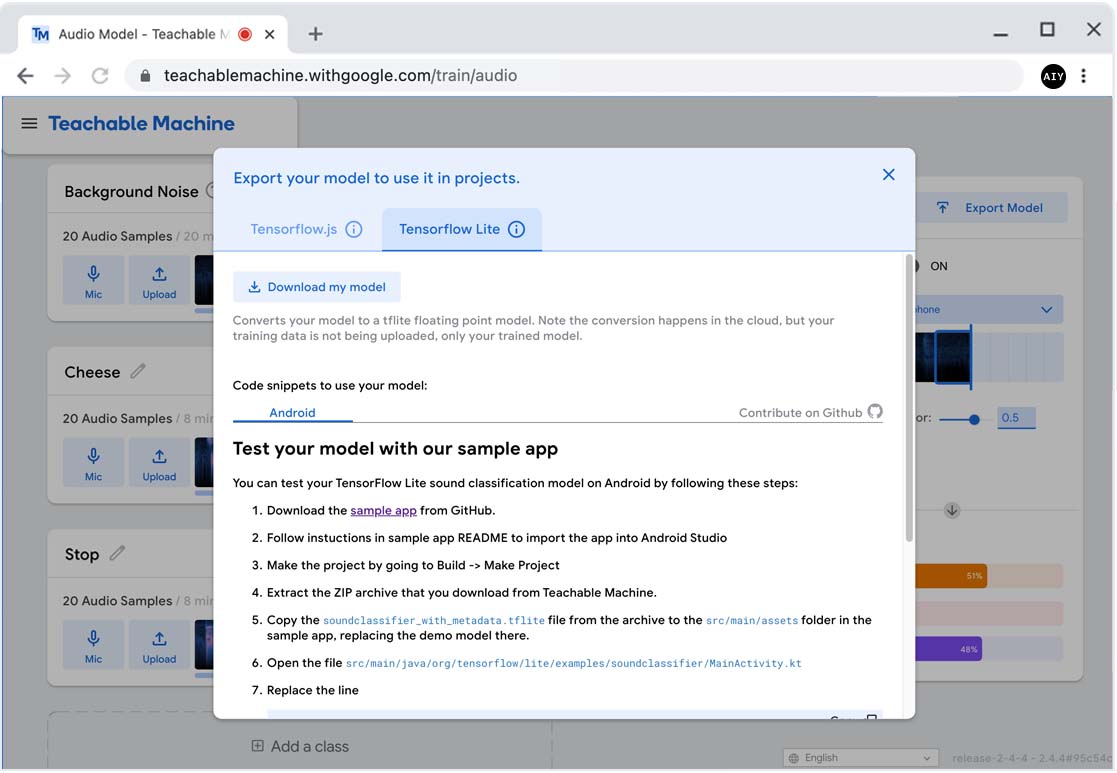
Download the TF Lite model
If you're satisfied with the model performance, click Export Model.
In the dialog that appears, click the Tensorflow Lite tab and then click
Download my model.
The model should appear on your Raspberry Pi at ~/Downloads/converted_tflite.zip.
Backup your dataset
Collecting audio samples is tedious work, so you should keep the recordings you created,
in case you want to retrain your model later. (If you close the web browser now, you
will loose all those samples!)
For each class, click the three-dot button in the top-right corner of the class panel and
click Download Samples or Save Samples to Drive.
If you later decide to retrain the model, such as to record a larger dataset or add more
commands to the model, you can easily upload these recordings by clicking the Upload
button (next to the Mic button).
3. Run the model
Note: Unlike the vision models used above, the speech recognition
model does not benefit from acceleration on the Coral USB Accelerator, because the speech model is
much smaller and the Raspberry Pi is powerful enough to handle it. So for your own
projects that use only a speech recognition model, you can disconnect the Coral USB
Accelerator because it will not be used.
Open a terminal on the Raspberry Pi and unzip the package from Teachable Machine like this:
unzip ~/Downloads/converted_tflite.zip
This will extract two files: soundclassifier_with_metadata.tflite
and labels.txt.
Run our example for audio classification, passing it the path for the
.tflite file:
Wohoo! Now let's write some code to respond to these voice commands.
To quit the demo, press CTRL + C.
Note: We don't need to specify the labels file when we run this model,
because this .tflite file was build with metadata that includes all the labels. So the
aiymakerkit.audio API reads the labels right from the .tflite file.
4. Take a picture on command
Now let's take a photo in response to the "cheese" voice command.
Make a copy of classify_audio.py with a new name and open it in Thonny:
cp classify_audio.py voice_camera.py
thonny voice_camera.py &>/dev/null &
Take a look at the current code: It defines one function called
handle_results() and the main script calls
classify_audio(), passing it our trained model
and the handle_results() function as a callback.
The classify_audio() function activates the default microphone,
initializes the model, and starts passing one-second audio samples to the
model. Then, when classify_audio() receives results from the model, it
passes them back to your code in the handle_results() function. That's
why it's called a "callback": The classify_audio() function calls back to
our program through the handle_results() function.
Also notice that classify_audio() is a blocking function, which means it
blocks all code that follows it from executing, until it's finished. And
the only way it will finish is if you return False from your callback
function. Currently, the callback function always returns True so
classify_audio() never finishes and you must force-quit the program.
To create a voice-activated camera, let's start by writing the code that will
capture photos.
In our previous vision ML projects, we used a loop to continuously pass
camera frames to our vision model. But we don't have that kind of loop
here, so we need a different approach to capture photos. One of the most
popular APIs for this task on Raspberry Pi is the picamera
API, so we'll
use that.
Let's start by importing some new modules at the top.
We'll use PiCamera to capture photos, datetime to add a timestamp to the
filename, and os to set the path where we save the file:
Next, we need to specify the location to save photos and initialize
PiCamera. This code should go below the import statements and before
handle_results():
Now we've initialized the camera, but it's important that we also terminate
the camera object when we're done with it, using PiCamera.close(). And,
because the call to classify_audio() is the heart of our program, we can do
that by wrapping it in a try-finally block like this:
This ensures that, no matter what happens during execution of
classify_audio(), it will always be followed by the code in
the finally block, which closes the camera.
Now the camera is ready to be used anywhere in our program. So let's add a
function that captures and saves a photo. This needs to appear after the
camera object is initialized and before handle_results():
All that's left to do is rewrite handle_results() to respond when the
returned label is either "Cheese" or "Stop".
If the returned label is "Stop," we return False to quit the program. If the
returned label is "Cheese," we take a photo and return True. We also need
to be sure we return True when neither is detected, so the model keeps
running:
Now that you've learned a bit about what's possible using machine learning,
what else can you create?
Discover more APIs
Before you start a new project, it's a good idea to get familiar
with the available tools. The project tutorials above introduce
several important features from the aiymakerkit API, but
there are still more APIs available.
To get started, read through the aiymakerkit API reference
(it's not very long).
We didn't use all these APIs in the projects above, so you might discover
some APIs that will help you with your next project. Plus,
some of the functions we already used support more
parameters that we didn't use. For example, the draw_objects() function
allows you to specify the line color and line thickness for the bounding boxes.
Explore the source code
This is optional.
There's a lot more you can learn by looking at the aiymakerkit source code,
but if you're not in the mood to read lots of code, you can skip this section.
On your Raspberry Pi, you might have noticed there's a lot more in the
aiy-maker-kit/ directory than just example code. This directory also
includes the source code for the aiymakerkit Python module (which is what
we import at the top of all the examples).
So if you're curious how these APIs work (are you curious how draw_pose()
actually draws the keypoints on your body?),
just open the aiy-maker-kit/aiymakerkit/ directory and view the files inside.
You'll notice that the aiymakerkit API depends on a variety of
other APIs, such as PyCoral to perform
ML inferencing, OpenCV
for video capture and drawing, and
PyAudio for audio capture.
These other API libraries offer a wealth of capabilities not provided by
aiymakerkit, so you might want to explore those libraries as well to find
other APIs you can use in your project.
And, if you see something you'd like to change or add to the aiymakerkit API,
just edit the code right there. To then use the changes in your project, just
reinstall the aiymakerkit package:
python3 -m pip install -e ~/aiy-maker-kit
The -e option makes the installation "editiable." That means
if you continue to change the aiymakerkit source code, any projects that import
these modules automatically receive those change—you won't need to reinstall
aiymakerkit again.
Finally, if you want to explore the aiymakerkit code online, you can see it all
on GitHub.
Vision projects
The number of projects you can build using vision intelligence
(such as image classification, object detection, and pose
detection) is endless. So here are just a few ideas to get
you going:
Smart bird watcher
The idea is to build a smart camera that keeps records about all the birds that
visit you. This is a popular project for bird enthusiasts, especially because
there are already great bird recognition models available for you to use.
You can quickly get started by downloading
a MobileNet bird classification model and just
passing it to the classify_video.py example:
Tip:
To test the model, try holding up photos of birds in front of the camera
(use a computer or smartphone screen).
To start building the bird watcher, you can simply
copy the classify_video.py example
and then start adding code to keep records of the birds.
For example, you might take a picture each time a new bird arrives
and record the bird name (the label returned by labels.get(classes[0].id))
and a timestamp in the image file name:
Be careful! The classify_video.py
example classifies images very fast, so if you merely add this code to save
an image, you might save hundreds of images of the same bird. Plus, saving
each file slows down your program thread. So be sure you add some logic that
will avoid lots of duplicate bird entries, such as a time delay between
saving images and a comparison to the most recently detected bird.
Then place the camera somewhere it can see birds close up, such as facing out
a window where there's a bird feeder. If you want to put your Maker Kit
outdoors, then you'll need to put it in a water-proof enclosure.
Advanced photo booth
We already built a face-detecting smart
camera, but you can still
improve this project in in several ways. For example:
Use a different camera.
This is a simple way to improve the image quality. The aiymakerkit API
for image capture (vision.get_frames()) works with any camera
attached using the flat flex cable (such as the Raspberry Pi High Quality
Camera)
or with a USB camera. If using a USB camera, just make sure to disconnect the
Pi Camera so the USB camera becomes the default camera, otherwise, you'll
need to specify capture_device_index when you call get_frames().
Use two cameras.
You can use the primary camera (Pi Camera or USB camera) as the input for
your ML model, but then capture the photos with a digital camera connected
via USB, which you can control using the
gphoto2 library. This
allows you to use a much more sophisticated camera like a DSLR to save photos,
but you still need the smaller camera to run your ML model.
Add speech recognition.
Perhaps capture a photo only when your face(s) is visible and you
say a magic word.
Use pose classification.
Maybe you have to strike one of several poses to take a photo.
For the best performance, train your pose classification model
with samples you collected in the same environment where you'll use
the photo booth.
When setting up the booth, point the camera(s) toward a backdrop
or a blank wall and make sure there's plenty of light.
Pose memory game
The pose classification project shows
how you can build a model that recognizes your body poses. So maybe you
can turn this into a memory game in which you must repeat specific poses
as instructed by the game.
This idea is just like the electronic simon
game, except instead of pressing
colored buttons, you must strike specific poses.
So the game starts by telling you to strike one pose. If you get it right,
it repeats the same pose instruction and adds another. You must then strike
the first pose, followed by the second pose. The game continues to add another
pose with each round. The game continues until you get a pose wrong.
Tips:
Start by building the part of the game that randomly selects one of the known
poses and prints the name in the terminal. Then write the code to
"accept" the player's pose and compare it to the randomly selected pose.
Beware that the pose classification model delivers pose predictions very fast,
so your game should not immediately "accept" the model results. You should be
sure that the player holds the pose for a moment. So wait until the model
consistently delivers the same prediction over and over for a short period of
time, perhaps 2 seconds. (Allow some leeway so the prediction is allowed to
vary a little within that period.)
Each time the game selects a new random pose, add the pose name to a Python
list. After the game prints all poses to the terminal (by reading from the
list), compare the player poses to each item in the list. Repeat until the
player gets a pose wrong.
Just to get started, here's some example code that prints a pose name from a
list, waits a moment, and then deletes the line before printing the next pose
(so the player must remember the pose):
So far, we've created just one project using audio from
a microphone, but there are so many things you can create with a simple
speech or sound classification model.
Here are some other project ideas:
Voice-activated lights
The code we used to create the voice-activated
camera can be easily
repurposed for a variety of projects that basically push a button
or flip a switch for you in response to a voice command. The opportunities
here are limitless, but they often require electronics hooked up
to the Raspberry Pi.
To do something like turn lights on and off, you need to wire your
lighting components to the Raspberry Pi's GPIO pins (the two rows
of gold pins standing up on top of the Raspberry Pi). If you've never used
the GPIO pins before, check out this introduction to
GPIOs.
And when it comes to lighting, there are varying degrees of electrical
complexity which can be dangerous when working with lights that require an
additional power source. So if you're new to this sort of thing, the safest
place to start is by lighting up a single LED (which can be powered entirely by
the Raspberry Pi). The aforementioned introduction to
GPIOs also
shows you how to do this. So once you get to the point you can switch an LED on
and off with some code, just add the speech recognition code to turn the light
on or off based on the recognized speech commands.
Voice-controlled robot
A robot that responds to your commands isn't a science-fiction
fantasy anymore! Now you have the tools to make it a reality.
Using what you've learned so far, this robot probably won't do
the dishes or the laundry just yet, but you can start by
giving it some basic navigational instructions.
To get started, you need to assemble a small robot.
There are plenty of assembly guides online for this sort of
project that use a Raspberry Pi plus some wheels, motors, a motor
driver, and a battery pack (to power the motors). You'll also need a
power bank to power the Raspberry Pi (a battery pack that can charge your phone
usually provides the necessary 5V and 3A power needed by the Raspberry Pi).
Perhaps the most simple guide to build a robot is from the Raspberry Pi
Foundation to build a robot
buggy.
As soon as you get it going to do some basic maneuvering, like
drive in a square over and over, just add some code for a speech recognition
model so you can give the robot your driving commands. Just like we did to
build a voice-activated camera,
train a new speech model to understand commands such as, "go," "stop," "left,"
and "right."
Tip:
Instead of recording a new speech dataset in Teachable Machine, try the
Colab tutorial to train an audio classificaion model, which provides
a huge speech dataset that includes commands for "go," "stop," "left,"
and "right."
Then make it a game to see how quickly you can navigate your robot
through an obsticle course using only voice commands.
Run your app at bootup
When you're done developing your project and ready to put your Maker Kit
to work, you might want your Python program to automatically start when
the Raspbery Pi boots up. That way, if the board loses power or you need to
reset for any reason, all you need to do is power it up and your program starts
without requiring you to connect to the desktop or a remote shell.
You can make this happen by creating a
systemd
service, which is defined in a .service file.
As an example, we included the following detect_faces.service file in
~/aiy-maker-kit/examples. It's designed to run the detect_faces.py example
when the device boots up, but it's disabled by default.
Reload the service files so the system knows about this new one:
sudo systemctl daemon-reload
Now enable this service so it starts on bootup:
sudo systemctl enable detect_faces.service
All set! You can try manually running the service with this command:
sudo service detect_faces start
Notice that you don't see any terminal output from the Python script, because
you didn't actually execute the script from the terminal—it was executed by the
service manager. But you can still press Q to quit the example
when the camera window is in focus.
Or you can reboot the system to see it automatically start at bootup:
sudo reboot
As soon as the desktop reappears, you should see the camera window
and a bounding box around your face.
Customize the service config
To create a service configuration for your own project, just copy the above file
using unique file name (the name must end with .service) and save it somewhere
in your Home directory (such as /home/pi/projects/). Then edit the
Description and change change ExecStart so
it executes your program's Python script.
You must then repeat the steps above to create symlink to your service file,
reload systemctl, and enable the service.
The .service file accepts a long list of possible configuration options, which
you can read about in the .service config
manual.
Note: The above example includes the line
Environment=DISPLAY=:0 because the face detection demo requires
a display to show the camera images. So if your project doesn't require
a display, you can remove this line. However, if you are still fetching
camera images from get_frames(), then you must also pass the
function argument display=False so it does
not attempt to show images in a deskotp window.
Other tips
To manually stop the service once it's running, use this command:
sudo service detect_faces stop
If you want to disable the service so it no longer runs at bootup, use
this command:
sudo systemctl disable detect_faces.service
You can also check the status of your service with this command:
sudo service detect_faces status
Models guide
The projects above use some trained models and even train a couple new ones, but there are more
models you can try and the opportunities to train your own are endless. This section introduces
just a few places where you can start exploring other models.
Trained models
The following models are fully trained and compiled for acceleration on the Coral USB Accelerator.
Each of the following links take you to a page at www.coral.ai where you'll find the model
files. On that page, there's a table that describes each available model and the last column
includes the download links. Make sure you download the Edge TPU model.
Image classification
Models that recognize the main subject in an image,
and are compatible with the Classifier API.
Most models are trained with the same dataset of 1,000 objects, but there are
three models trained with the iNaturalist dataset to recognize different types
of birds, insects, or plants.
Models that identify the location and label of multiple objects, and are compatible
with the Detector API.
These are trained with a dataset of 90 objects (except for the one model
trained to recognize faces—the same model used above). Notice that although
some models are more accurate (the mAP score is higher), they are also slower (the
latency is higher).
Models that identify the location of several points on the human body, but
only the MoveNet models are compatible with the PoseDetector API.
The PoseNet models detect the same 17 keypoints but they output a different format, so
although they do work with the Maker Kit, you must use different code as demonstrated
in this PoseNet example. One of the
only reasons you might want PoseNet instead is to detect the pose of multiple
people.
Models that can classify individual pixels as part of different
objects, allowing you to know the more precise shape of an object, compared to
object detection (which provides just a bounding-box area).
We do not offer an API for this type of model in aiymakerkit because the applications
for such models are more complicated. To try it out, you can use this code with the
PyCoral API.
Nowadays, crating a model for common machine vision tasks such as image classification and
object detection does not require that you actually design the neural network yourself. Instead,
you can (and should) use one of many existing network designs that are proven effective,
and instead focus on the training effort (gathering your training dataset and fine-tuning the
training script).
Training a neural network model from scratch means you start with a network that has no learned
weights—it's just a blank neural network. Depending on the model, training a model from scratch
can take a very long time. So another shortcut often used (in addition to using an existing
network design) is re-using the weights somebody else created when training the model, and
then "fine tuning" the weights with a much shorter version of training.
This simplified training process is often called "transfer learning" or just "retraining," and
it's the technique we recommend you use with the following training scripts.
All the training scripts below run on Google Colab, which we introduced in the
pose classification project. Each script includes its own
training dataset so you can immediately learn how to retrain a model, but you can then replace that
dataset with your own. To learn more about Google Colab,
watch this video.
Did you know? Every training dataset includes
sample input data (such as images) along with the corresponding "ground
truth" results that we want to receive from the model's output (the label for
an object in an image). A training program feeds the sample data to the model
and the model performs a prediction (also called an "inference") for each
input. Then, by calculating how close the prediction is to the ground truth
result, the training program updates some numbers in the model so it can
provide a better result next time. This repeats over and over and that's how
machine learning models actually learn.
Creating your own image classifier is quite easy these days. In fact,
you already did it in the custom image classifier project!
And if you collect enough training data (more images for each class in your dataset), that
technique allows you to create very effective image classifiers that are quite fast on
the Raspberry Pi with the USB Accelerator.
Another tool we recommend is the web-based Teachable Machine, which provides a very simple
graphical interface to upload and train a classification model:
Rename each class (default names are "Class 1" and "Class 2") and add more classes as needed.
Click the corresponding buttons for each class to upload or capture training images.
Click Train model to generate your model. This should finish almost immediately.
Click Export model > TensorFlow Lite > EdgeTPU, and then Download my model.
It might take a couple minutes to convert the model, but it will soon download a ZIP with a
.tflite and labels.txt file you can use with the Classifier API.
Or, if you want to go the more traditional route and train a model using TensorFlow directly, then
we suggest you try our Colab tutorial to Retrain a classification model for the Edge
TPU.
Train an object detection model
Training an object detection model isn't very complicated either, but collecting and annotating
your dataset can be a bit confusing at first and then very time consuming to perform.
That's because, whereas an image classification dataset only needs to be organized into labeled
folders, an object detection dataset must be fully annotated with bounding box information. That
is, in order for your model to learn how to locate the position of an object, you must specify the
correct bounding-box coordinates for each object you want it to learn (in every image of your
training dataset).
Fortunately, there are several programs available online that can help you annotate your
object detection dataset. We suggest using a free, open-source annotation tool such as
Make Sense or LabelImg
to add bounding-box annotations to your images. Then, for compatibility with the following
Colab tutorials, export your annotations into the Pascal VOC format, which creates an XML file for
each image with all the annotation information.
But if you've never trained an object detection model, we suggest you first try running one of
these tutorials so you can observe the process and even inspect the annotations before you start
building your own dataset.
Both of these Colab tutorials provide a default training dataset for retraining the model, but also
support uploading a custom dataset:
For beginners, this tutorial is the easiest to reuse with your own dataset. The Colab notebook
is designed to support custom datasets that are uploaded in the Pascal VOC format and it usually
finishes retraining in less than an hour.
This Colab also accepts annotations in the Pascal VOC XML format and is designed to support
custom dataset uploads. Beware that training this MobileDet model takes much longer, compared to
the EfficientDet model in the previous tutorial. However, the MobileDet model typically executes
faster than EfficientDet, while it's accuracy is still very good (although usually not as good
as the larger variations of EfficientDet).
Just remember that this pose classification model does not perform pose estimation. For that,
you need to actually feed your image to a model like MoveNet or PoseNet. Your custom pose
classification model does not take an image as input; it takes the keypoint data that's output by
one of those pose estimation models.
Train an audio classification model
If you want to create a model that can classify sounds from the microphone
(including speech), we recommend the following options:
Follow the steps in the above project to
build a voice-activated camera,
using Teachable Machine.
You can record audio samples to classify any sounds you want, such as
types of music or speech commands.
This is the easiest way to train a model with your own audio recordings
because Teachable Machine includes a microphone recorder to gather
your dataset. You can even download the dataset to preserve it for future
Teachable Machine projects, or to process the samples using other tools.
Follow the Colab tutorial to Retrain a speech recognition model with TFLite Model
Maker.
This produces the same kind of model as Teachable Machine but gives you more
control of the training process. The difficult part with this option is
creating a new audio dataset, because unlike Teachable Machine, this Colab does
not record audio samples for you. So to use a custom dataset, you instead need
to upload a collection of one-second WAV files that you already recorded.
However, this Colab also
offers the ability to train the model with an existing dataset that includes
thousands of samples for 30 speech commands.
By default, the Colab uses just a subset of this speech
dataset—it trains a model to classify
"up", "down", "left", "right", "go", "stop", "on", and "off."
Just open the Colab and click Runtime > Run all and it will train this
version of the model for you!
If you want to choose your own commands from the same dataset, just find
the line of code that specifies the commands list
(under "Prepare the speech commands dataset") and specify
a different set of commands that are available in the dataset. Here are all
the available commands:
bed, bird, cat, dog, down, eight, five, four, go, happy, house, left,
marvin, nine, no, off, on, one, right, seven, sheila, six, stop, three,
tree, two, up, wow, yes, zero
Several words in this list are not neccessarily useful as speech commands
(such as "tree," "bed," and "marvin") but they're included so the trained
model can learn to recognize (and ignore) non-trigger words. For example,
your model may become better at accurately classifying "three" if it also
learns to distinguish it from "tree." Thus, you might find it useful to
train the model with more commands than you actually plan on using.
Tip: If the commands you want to use are available
in the speech commands dataset, we recommend using them instead of
recording your own with Teachable Machine. This dataset has thousands
of samples recorded by thousands of different voices, so the model will
be much more accurate compared to a dataset you create with only one
voice sampled only dozens of times.
API reference
The following Python APIs are provided by the aiymakerkit module, which is
used in the above tutorials.
We designed these APIs to simplify your code for the most common TensorFlow
Lite inferencing tasks. But by no means does this represent everything you
can do with ML on the Raspberry Pi and Coral USB Accelerator.
Converts keypoint data into dictionary with values scaled for the image
size.
Parameters
frame – The original image used for pose detection.
keypoints – A COCO-style keypoints tensor in shape [17, 3], such as
returned by PoseDetector.get_pose().
threshold (float) – The minimum confidence score for returned results.
Returns
A dictionary with an item for every body keypoint detected above the given
threshold, wherein each key is the KeypointType and the value is a
tuple for its (x,y) location.
size (tuple) – The image resolution for all frames, as an int tuple (x,y).
handle_key – A callback function that accepts arguments (key, frame) for
a key event and the image frame from the moment the key was pressed.
This has no effect if display is False.
capture_device_index (int) – The Linux device ID for the camera.
mirror (bool) – Whether to flip the images horizontally (set True for a
selfie view).
display (bool) – Whether to show the camera images in a desktop window
(set False if you don’t use a desktop).
return_key (bool) – Whether to also return any key presses. If True, the
function returns a tuple with (frame, key) instead of just the frame.
Returns
An iterator that yields each image frame from the default camera. Or a
tuple if return_key is True.
Draws the pose skeleton on the image sent to the display and returns
structured keypoints.
Parameters
frame – The bitmap image to draw upon.
keypoints – A COCO-style pose keypoints tensor in shape [17, 3], such as
returned by PoseDetector.get_pose().
threshold (float) – The minimum confidence score for returned keypoint data.
color (tuple) – The BGR color (int,int,int) to use for the bounding box.
circle_radius (int) – The radius size of each keypoint dot.
line_thickness (int) – The pixel thickness for lines connecting the
keypoint dots.
Returns
A dictionary with an item for every body keypoint that is detected above
the given threshold, wherein each key is the KeypointType and the
value is at tuple for its (x,y) location.
(Exactly the same return as get_keypoint_types().)
Continuously classifies audio samples from the microphone, yielding results
to your own callback function.
Your callback function receives the top classification result for every
inference performed. Although the audio sample size is fixed based on the
model input size, you can adjust the rate of inference with
inference_overlap_ratio. A larger overlap means the model runs inference
more frequently but with larger amounts of sample data shared between
inferences, which can result in duplicate results.
callback – A function that takes two arguments (in order): a string for
the classification label, and a float for the prediction score.
The function must return a boolean: True to continue running
inference, or False to stop.
labels_file (str) – Path to a labels file (required only if the model
does not include metadata labels). If provided, this overrides the
labels file provided in the model metadata.
inference_overlap_ratio (float) – The amount of audio that should overlap
between each sample used for inference. May be 0.0 up to (but not
including) 1.0. For example, if set to 0.5 and the model takes a
one-second sample as input, the model will run an inference every
half second, or if set to 0, then there is no overlap and
it will run once each second.
buffer_size_secs (float) – The length of audio to hold in the audio
buffer.
buffer_write_size_secs (float) – The length of audio to capture into the
buffer with each sampling from the microphone.
audio_device_index (int) – The audio input device index to use.
Performs classifications with a speech classification model.
This is intended for situations where you want to write a loop in your code
that fetches new classification results in each iteration (by calling
next()). If you instead want to receive a callback each time a new
classification is detected, instead use classify_audio().
labels_file (str) – Path to a labels file (required only if the model
does not include metadata labels). If provided, this overrides the
labels file provided in the model metadata.
inference_overlap_ratio (float) – The amount of audio that should overlap
between each sample used for inference. May be 0.0 up to (but not
including) 1.0. For example, if set to 0.5 and the model takes a
one-second sample as input, the model will run an inference every
half second, or if set to 0, it will run once each second.
buffer_size_secs (float) – The length of audio to hold in the audio
buffer.
buffer_write_size_secs (float) – The length of audio to capture into the
buffer with each sampling from the microphone.
audio_device_index (int) – The audio input device index to use.
Each time you call this, it pulls from a queue of recent
classifications. So even if there are many classifications in a short
period of time, this always returns them in the order received.
Parameters
block (bool) – Whether this function should block until the next
classification arrives (if there are no queued classifications).
If False, it always returns immediately and returns None if the
classification queue is empty.
A dictionary of (int, string), mapping label ids to text labels.
More information
Learn more
To learn more about some of the tools and topics covered above, check out
these other resources:
Linux basics:
This is a great resource if you're new to Raspberry Pi OS (which is a Linux
operating system). It includes lots of information and tips about using the
terminal (the command line) and many other features of a Linux OS.
Python basics:
This is a good reference for basic Python programming syntax. If you want
a comprehensive introduction to Python, there are lots of online
tutorials you can find just by searching the internet for
"python for beginners."
Machine learning basics with TensorFlow:
You can find a plethora of educational content online about ML, but
this page offers some specific recommendations about learning ML
from the TensorFlow team.
Or maybe you're looking for the Maker Kit source code:
Report an issue with Maker Kit:
If you discover something wrong with the AIY Maker Kit software or any of
the website documentation, please report it here.
Upgrade an existing Raspberry Pi system
For experienced Raspberry Pi users only!
If you have a fully-functional Raspberry Pi system and you want to upgrade it to
accelerate TensorFlow Lite models with the Coral USB Accelerator, then these
instructions are for you.
Beware: We cannot guarantee this will work for you
because there is an infinite number system configurations you might
have that we have not tested. If you follow these instructions and encounter
errors you're unable resolve, we cannot offer support and you should probably
follow the instructions to flash the
Maker Kit system image.
Before you start, be sure you have all the required hardware:
Raspberry Pi 3 or 4 running Raspberry Pi OS with desktop (Buster only)
Raspberry Pi Camera
Coral USB Accelerator
Note: We currently do not support Raspberry Pi OS
Bullseye, due to breaking changes in the camera framework. We recommend
using the Buster release and it must have a desktop.
Here's how you can upgrade your system with the Maker Kit software:
Before you power the board, connect the Pi Camera Module. Leave the USB
Accelerator disconnected until you finish the setup script.
Power the board and connect to your Raspberry Pi terminal. You
must have access to the Raspberry Pi OS desktop becuase our demos depend on
the desktop to show the camera video.
Open the Terminal on your Raspberry Pi. Navigate to a path where you want to
save the Maker Kit API repository and run this command:
You did it! Whether this was your first hackable project or you’re a seasoned maker, we hope this project has sparked new ideas for you. Keep tinkering and remixing this project!